How to Install an SSL Certificate on Plesk Panel
Installing SSL on Plesk Panel involves two core phases: uploading your certificate and enabling HTTPS. Go to SSL/TLS Certificates → Manage, upload your certificate (either by pasting the CRT code or uploading .crt and .ca.crt files), then open Hosting Settings and tick both SSL/TLS support and Permanent SEO-safe 301 redirect from HTTP to HTTPS. Click OK to finish. If CSR generation and domain validation are already done, the installation typically takes just a few minutes. This guide covers both upload methods with screenshots and walks through the HTTPS activation steps that are most commonly missed.
Quick Overview: Plesk SSL Installation
- Log in to Plesk
Access Plesk from your hosting provider's panel or directly at server-ip:8443. - Open SSL/TLS Certificates
Click the padlock icon on the Plesk dashboard. - Click Manage
Click "Manage" under "Download or remove existing certificates." - Upload Your Certificate
Method 1: paste the CRT code. Method 2: upload .crt and .ca.crt files. - Open Hosting Settings
Click Hosting Settings from the Plesk main dashboard. - Enable HTTPS and 301 Redirect
Tick both checkboxes, select your certificate, click OK. - Verify
Confirm the padlock appears and run an SSL Labs test.
What You Need Before Starting
Have these ready before beginning. Missing any one will stop the installation or leave the certificate non-functional.
| Requirement | Details |
|---|---|
| SSL certificate | A valid certificate purchased and fully validated for your domain. |
| .crt file | Your primary certificate file — found inside the zip from your CA. |
| CA Bundle (.ca.crt) | Intermediate certificate chain. Without it, some browsers show a security warning even after installation. |
| Plesk access | Admin-level login to the Plesk Panel on your server. |
| Domain name | The exact domain the SSL was issued for — must match the certificate's Common Name. |
Step 1 — Log In to Plesk
Access Plesk from your hosting provider's management dashboard — find your plan and click "Control Panel" or "Manage". You can also go directly to server-ip:8443 in your browser and log in with your Plesk credentials.
ℹ️ Don't know your Plesk login? Check the welcome email from your hosting provider. Plesk credentials are separate from your main account login.
Step 2 — Open SSL/TLS Certificates
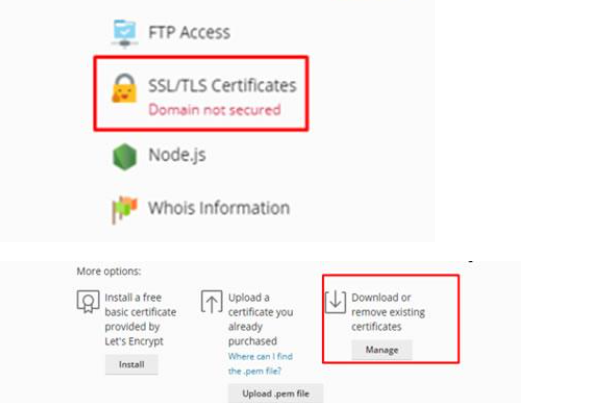
On the Plesk dashboard, click the "SSL/TLS Certificates" button (the padlock icon). You will see three options:
| Option | What It Does | When to Use |
|---|---|---|
| Let's Encrypt Install | Automated free certificate installation | If you want a free certificate |
| Upload .pem file | Upload a purchased certificate as .pem | If you have a PEM-format certificate |
| Manage (Download or remove) | Manage existing certificates | Use this for paid SSL installation |
Click the "Manage" button under "Download or remove existing certificates."
Method 1 — Paste the Certificate Code
Use this method if you received your certificate as a .cer or .crt file and prefer to paste the contents.
Step 3 — Click the Certificate Name
On the Manage screen, click the name of the certificate you want to configure.
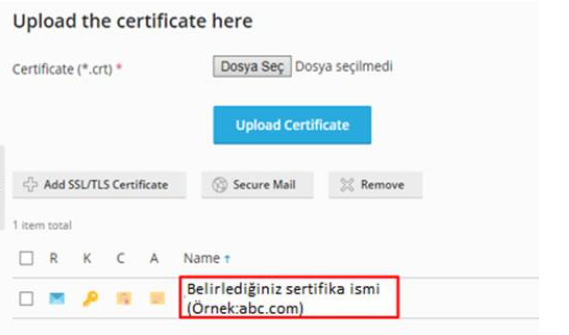
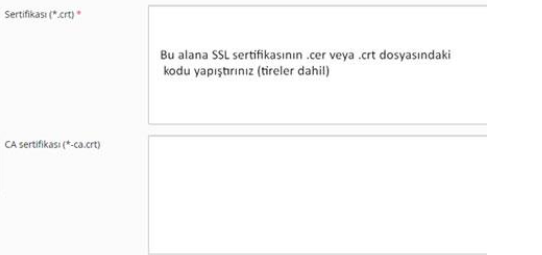
Step 4 — Upload the Certificate
Open the .cer or .crt file in a text editor, copy the entire contents — from -----BEGIN CERTIFICATE----- to -----END CERTIFICATE----- including the dashes — and paste into the .CRT field.
Click "Upload Certificate" to save.
⚠️ Copy the CRT exactly as-is, including the BEGIN/END lines and dashes. A missing character causes the upload to fail.
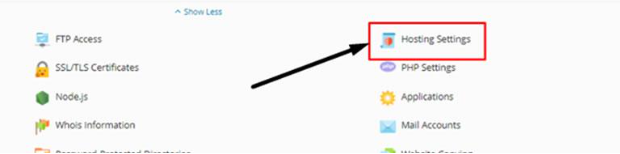
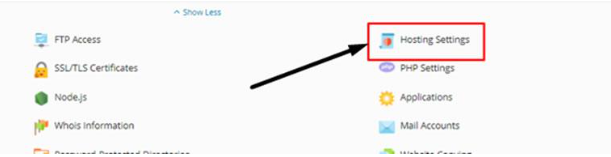
Step 5 — Open Hosting Settings
Return to the Plesk main dashboard and click "Hosting Settings."
Step 6 — Enable HTTPS and the 301 Redirect
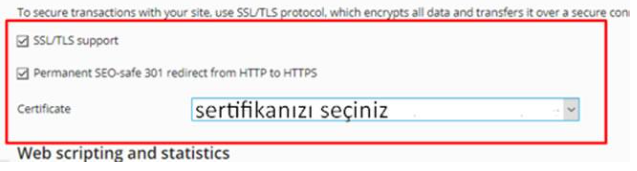
Two settings need to be enabled on this screen:
- SSL/TLS support — activates the certificate for this domain.
- Permanent SEO-safe 301 redirect from HTTP to HTTPS — automatically redirects all HTTP visitors to HTTPS. The 301 status tells search engines the move is permanent, preserving your SEO equity.
Select your certificate from the "Certificate" dropdown and click "OK."
ü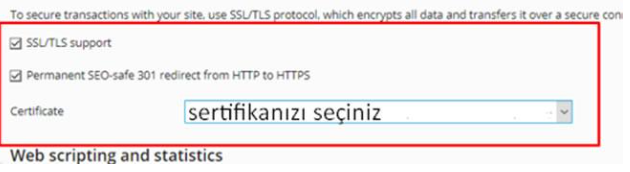
✅ Without enabling SSL/TLS support, HTTPS won't work even if the certificate is installed. Without the 301 redirect, visitors who type http:// will still reach the unsecured version. Both checkboxes are required.
Method 2 — Upload Certificate Files Directly
Use this method if your CA delivered ready-made .crt and .ca.crt files. It's the more straightforward option when you have all files at hand.
Step 3 — Click Your Domain Link
On the SSL/TLS Certificates page, click your domain link (yourdomain.com) to open the certificate upload page.
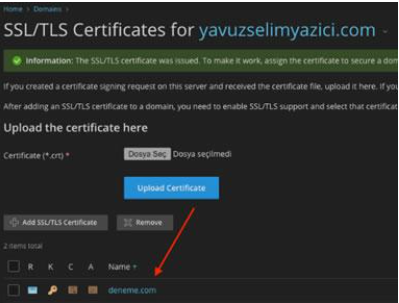
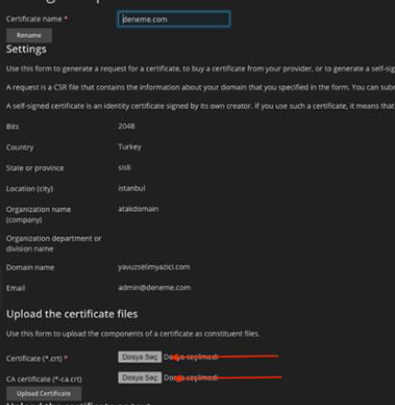
Step 4 — Upload .crt and .ca.crt Files
Under "Upload the certificate files," select your .crt file and your .ca.crt (CA Bundle) file.
"Upload Certificate" to complete the upload.
⚠️ Don't skip the CA Bundle (.ca.crt). Without it, some browsers and operating systems can't verify the full certificate chain and will display a security warning — even though your certificate is valid.
Step 5 — Open Hosting Settings
Return to the Plesk main dashboard and click "Hosting Settings."
Step 6 — Enable HTTPS and the 301 Redirect
- Tick the SSL/TLS support checkbox.
- Tick the Permanent SEO-safe 301 redirect from HTTP to HTTPS checkbox.
Select your certificate from the "Certificate" dropdown and click "OK."
✅ Method 2 produces the same result as Method 1 — the only difference is how the certificate is delivered to Plesk. Use whichever is more convenient.
Step 7 — Verify Your SSL Installation
Confirm the installation is working correctly before going live:
- Open https://www.yourdomain.com in a browser — a padlock in the address bar confirms HTTPS is active.
- Test http://yourdomain.com — it should redirect automatically to HTTPS.
- Open the browser console (F12 > Console) and check for Mixed Content warnings.
- Run a full test at ssllabs.com/ssltest — aim for an A grade or above.
- Note the certificate expiry date and set a renewal reminder at least 30 days out.
✅ No padlock? Check that SSL/TLS support is ticked in Hosting Settings and the correct certificate is selected. If the padlock appears but SSL Labs reports chain issues, the CA Bundle is likely missing — re-upload and include the .ca.crt file.
Reselling SSL certificates to your customers?
Domain Name API's SSL reseller program gives you API access to DV, OV, EV, and Wildcard certificates with WHMCS, HostBill, and Blesta module support.
Common Plesk SSL Errors and How to Fix Them
| Error | Likely Cause | Fix |
|---|---|---|
| Wrong certificate uploaded | Certificate issued for a different domain | Verify the Common Name matches the domain you're installing on. |
| CA Bundle not uploaded | Incomplete certificate chain | Method 1: paste the CA certificate code into the CA field. Method 2: select the .ca.crt file. |
| HTTPS not working — no padlock | SSL/TLS support not enabled in Hosting Settings | Tick the SSL/TLS support checkbox in Hosting Settings and click OK. |
| HTTP traffic not redirected | 301 redirect checkbox not ticked | Tick 'Permanent SEO-safe 301 redirect from HTTP to HTTPS' in Hosting Settings. |
| Certificate assigned to wrong domain | Different domain selected in Hosting Settings | Check Hosting Settings for the correct domain and repeat the activation. |
| Mixed Content warning | HTTP resources loading on an HTTPS page | Use F12 > Console to identify affected URLs and update them to HTTPS. |
Plesk SSL Best Practices
Tick Both Checkboxes in Hosting Settings
SSL/TLS support AND the 301 redirect checkbox must both be enabled. Without SSL/TLS support, HTTPS doesn't work. Without the 301 redirect, HTTP visitors are never sent to the secure version of your site.
Always Include the CA Bundle
In both methods, always provide the CA Bundle (intermediate certificate). Without it, some browsers may show a security warning even when the certificate itself is valid.
Wildcard Certificates — One Install Covers All Subdomains
For a Wildcard certificate (*.yourdomain.com), install it and enable it in Hosting Settings. The certificate can be used for first-level subdomains within its scope; depending on your Plesk configuration, additional setup may be needed for individual subdomains. Whether it also covers the root domain (yourdomain.com) depends on the CA's SAN field — verify with your provider.
Watch for Mixed Content After Enabling HTTPS
After switching to HTTPS, pages may load resources (images, scripts, stylesheets) over HTTP. Use the browser console (F12 > Console) to identify them and update hardcoded HTTP URLs to HTTPS.
Set a Renewal Reminder
SSL certificates are typically valid for one year. Renew at least 30 days before expiry — an expired certificate can negatively affect visitor trust and site accessibility.
If the Panel Redirect Isn't Working
On some Nginx-based or reverse-proxy Plesk setups, the panel's 301 redirect checkbox may not behave as expected. In that case, add a manual 301 redirect via Plesk > Domains > yourdomain.com > Apache & nginx Settings, or add a RewriteRule to your .htaccess file. Check whether your server runs Apache or Nginx and whether it's behind a load balancer or CDN.
Frequently Asked Questions
How do I install an SSL certificate on Plesk Panel?
Go to SSL/TLS Certificates > Manage in Plesk. Upload your certificate (paste the CRT code or upload .crt/.ca.crt files), then open Hosting Settings and tick SSL/TLS support and 'Permanent SEO-safe 301 redirect from HTTP to HTTPS.' Select your certificate and click OK.
Does HTTPS activate automatically after SSL is installed?
No. You need to manually enable SSL/TLS support and the 301 redirect in Hosting Settings. If these aren't ticked, visitors will still reach the HTTP version of your site.
Is the CA Bundle required?
Yes. Without the CA Bundle (intermediate certificate), some browsers and operating systems cannot verify the full certificate chain and will display a security warning. Always include it.
What is the difference between Method 1 and Method 2?
Method 1 uses copy-paste of the certificate code; Method 2 uploads .crt and .ca.crt files directly. Both produce the same result — choose whichever is more convenient for the files you have.
How do I enable the 301 redirect in Plesk?
In Hosting Settings, tick 'Permanent SEO-safe 301 redirect from HTTP to HTTPS' and click OK. This is separate from enabling SSL/TLS support — both checkboxes are required.
My SSL certificate isn't working after installation — what should I do?
First, confirm SSL/TLS support is ticked in Hosting Settings and the correct certificate is selected. Then run ssllabs.com/ssltest — it will identify chain issues, missing CA Bundle, or misconfiguration.
How do I install a Wildcard SSL certificate on Plesk?
The process is identical to a standard certificate. Upload the Wildcard certificate file, enable SSL/TLS support and the 301 redirect in Hosting Settings. The certificate can be used for first-level subdomains within its scope; depending on your Plesk configuration, additional setup may be needed per subdomain.
What is Mixed Content and how do I fix it?
Mixed Content occurs when an HTTPS page loads resources (images, scripts, fonts) over HTTP. Open the browser console (F12 > Console) to identify the offending URLs and update them to HTTPS or protocol-relative paths (//).
Is there technical support available for Plesk SSL installation?
Domain Name API provides technical documentation and integration resources for its SSL reseller program. For details, visit the SSL Reseller page.
Summary
Plesk SSL installation comes down to three actions: upload the certificate, tick SSL/TLS support, tick the 301 redirect. The two checkboxes in Hosting Settings are the steps most commonly missed — without them, a correctly installed certificate still won't serve HTTPS traffic.
Once the padlock is confirmed and SSL Labs reports an A grade, note the expiry date and you're done.
If you're managing SSL for multiple clients or running a hosting business, automating certificate provisioning through Domain Name API's SSL reseller program, the REST API integration, or the WHMCS module eliminates manual handling at scale. The domain reseller platform is also worth exploring.
Managing SSL at Scale?
Domain Name API provides SSL reseller access, a REST API for automated provisioning, and ready-made modules for WHMCS, HostBill, and Blesta.
