How to Install an SSL Certificate on IIS
To install an SSL certificate on IIS, open IIS Manager, navigate to Server Certificates, and click Complete Certificate Request to upload your .crt file. Then right-click your website, select Edit Bindings, and add an HTTPS binding on port 443 with your certificate selected. The full process — from generating a CSR to verifying your installation — takes around 15 minutes on most Windows Server environments. This guide walks through every step with screenshots, covers common errors, and explains how to set up automatic HTTP-to-HTTPS redirects.
Need SSL certificates for your hosting business?
Domain Name API offers SSL reseller access — DV, OV, EV, and Wildcard certificates through a single API.
What You Need Before Installing SSL on IIS
Before you open IIS Manager, have these ready. Missing any one of them will stall the installation mid-process.
| Requirement | Details |
|---|---|
| IIS Manager access | Internet Information Services Manager must be installed and running on your Windows Server. |
| Administrator permissions | You need local or domain Administrator rights on the server. Standard user accounts cannot install certificates. |
| CSR (Certificate Signing Request) | Generated in IIS Manager during Step 2. The CSR also creates your private key — both must stay on the same server. |
| SSL certificate file (.crt) | Issued by your Certificate Authority after domain validation is complete. |
| CA Bundle / Intermediate certificate | Provided by your CA alongside the certificate. Required for a complete trust chain — don't skip this. |
| Private key | Created automatically when you generate the CSR in IIS. It stays on the server and is not a separate file you download. |
⚠️ If you generated your CSR on a different server or machine, you cannot use the Complete Certificate Request method. Export a .pfx file (certificate + private key) from the original server and use the Import function in IIS Server Certificates instead.
Step 1 — Choose the Right SSL Certificate
SSL certificates aren't one-size-fits-all. The type you need depends on how many domains you're securing and how much identity verification your users or customers expect.
| Type | What It Validates | Best For | Example |
|---|---|---|---|
| DV SSL | Domain ownership only | Blogs, personal sites, small business | www.yourdomain.com |
| OV SSL | Domain + organisation identity | Corporate websites, SaaS platforms | Company site |
| EV SSL | Extended company vetting | E-commerce, finance — highest trust level | checkout.yourdomain.com |
| Wildcard SSL | Domain + all first-level subdomains | Hosting providers, multi-subdomain deployments | *.yourdomain.com |
Hosting providers and domain resellers often find Wildcard SSL the most practical option — one certificate covers all subdomains without managing renewals for each one separately.
Selling SSL to your customers?
Domain Name API's SSL reseller program gives you access to DV, OV, EV, and Wildcard certificates at competitive reseller pricing.
Step 2 — Open IIS Manager
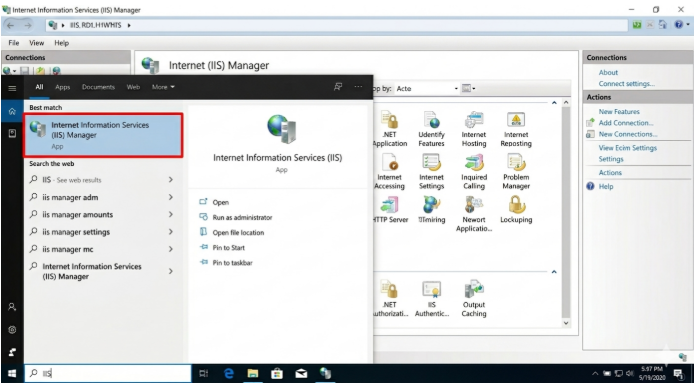
On your Windows Server, press Win + R, type inetmgr, and press Enter. Alternatively, search for "IIS" in the Start menu and select Internet Information Services (IIS) Manager.
ℹ️ IIS not installed? Go to Server Manager → Add Roles and Features → Web Server (IIS). On Windows desktop editions: Control Panel → Programs → Turn Windows features on or off → Internet Information Services.
Step 3 — Open Server Certificates
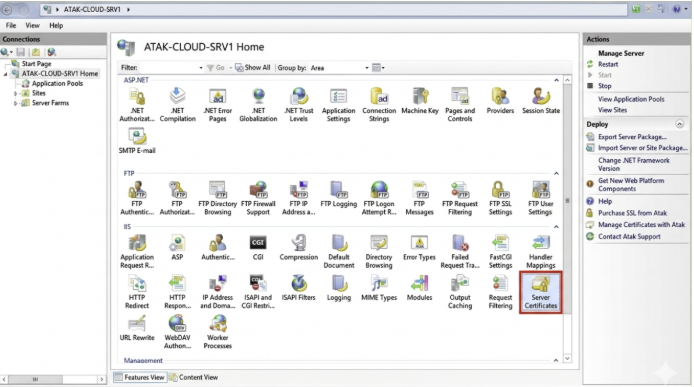
In the IIS Manager left-hand panel, click your server name. In the center pane, find and double-click the "Server Certificates" icon.
Step 4 — Generate a CSR (Certificate Signing Request)
If you haven't generated a CSR yet, do it here before uploading any certificate file.
Creating the CSR
- In the Actions panel (right side), click "Create Certificate Request…".
- Fill in the Distinguished Name fields — Common Name must exactly match the domain you're securing.
- Set the bit length to 2048 (minimum) or 4096 for stronger encryption.
- Save the .txt file — you'll paste its contents into your CA's order form.
Once your CA has issued the certificate, return here and proceed to Step 4b.
Uploading the Certificate — Complete Certificate Request
In the Actions panel, click "Complete Certificate Request…" to open the certificate installation wizard.

⚠️ CSR generated on a different server? You cannot use Complete Certificate Request. Instead, export a .pfx (PKCS#12) file — including the private key — from the original server and use the 'Import' option in the Server Certificates Actions panel.
Step 5 — Upload the Certificate File and Set a Friendly Name
The "Specify Certificate Authority Response" dialog will open. Complete the three fields:
| Field | What to Enter |
|---|---|
| File name (.cer) | Click "…" and select your .crt file. IIS accepts both .crt and .cer extensions. |
| Friendly name | A short, recognisable label — e.g. yourdomain.com-2025. You'll select this in Step 6. |
| Certificate store | Select "Personal". If the certificate doesn't appear later, try "Web Hosting" instead. |

Click "OK". The certificate is now installed on the server. It won't serve HTTPS traffic yet — that happens in Step 6.
Step 6 — Create an HTTPS Binding on Port 443
The certificate is installed, but IIS doesn't know which website to use it for. You need to create a binding that maps port 443 to your site and certificate.
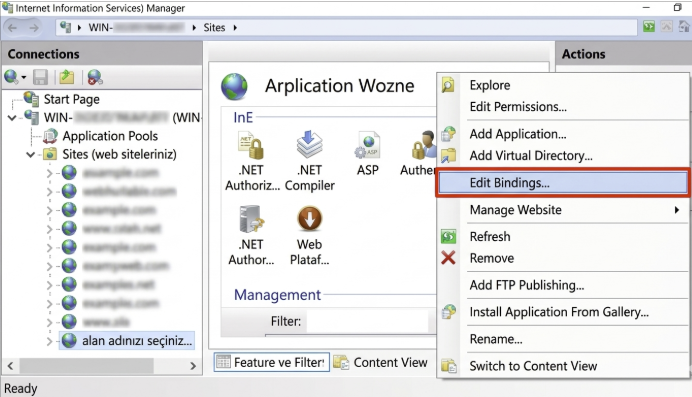
Right-click your website in the left panel and select "Edit Bindings…". In the Site Bindings window, click "Add".
| Field | Value / Notes |
|---|---|
| Type | https |
| IP Address | All Unassigned — or your server's specific IP if applicable |
| Port | 443 |
| Hostname | Enter the domain exactly as it appears on the certificate (e.g. www.yourdomain.com) |
| SNI | Tick "Require Server Name Indication" if multiple sites share this IP address |
| SSL Certificate | Select the Friendly Name you entered in Step 5 |
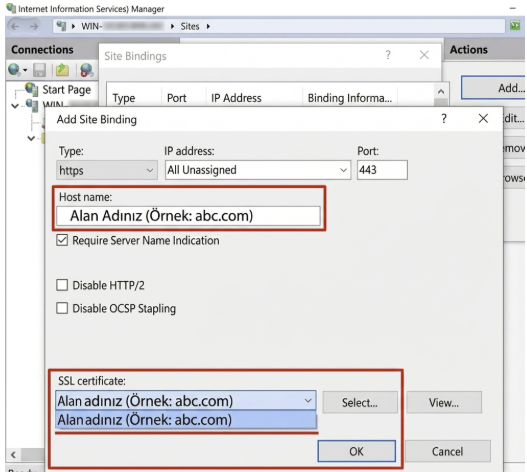
Click "OK" to save. Your site is now accessible over HTTPS.
What Is SNI and When Should You Enable It?
SNI (Server Name Indication) is a TLS extension that lets one IP address serve multiple SSL certificates — one per hostname. Without SNI, IIS can only present one certificate per IP, regardless of the hostname the client requests.
Enable SNI when: (a) you're hosting multiple HTTPS sites on a single server IP, or (b) your server is behind a shared load balancer. On IIS 7.5 and earlier, SNI is not supported — each domain needs a dedicated IP. IIS 8 and later support SNI natively.
Step 7 — Redirect HTTP to HTTPS
Adding an HTTPS binding doesn't automatically redirect http:// traffic. Without a redirect, some visitors — and search engine crawlers — will still reach the unencrypted version of your site.
Using IIS URL Rewrite (Recommended)
- Download and install the URL Rewrite module from Microsoft (free, via Web Platform Installer or direct download).
- In IIS Manager, select your site and double-click "URL Rewrite".
- Click Add Rule(s) → Blank Rule. Name it "HTTP to HTTPS".
- Set Match URL: Pattern = .*
- Add Condition: {HTTPS} matches pattern "^OFF$".
- Set Action: Redirect to https://{HTTP_HOST}/{R:0}, Redirect type: Permanent (301).
Why this matters for SEO and trust: Google has used HTTPS as a ranking signal since 2014. More immediately, Chrome and Edge mark any HTTP page as 'Not Secure', which reduces user trust and increases bounce rates — both indirect SEO negatives. A 301 redirect also consolidates link equity from any HTTP URLs to the canonical HTTPS version.
Step 8 — Verify Your SSL Installation
Don't assume it worked — confirm it. Run these three checks before considering the installation complete:
- Browser padlock: Open https://www.yourdomain.com in Chrome or Edge. A padlock icon in the address bar confirms HTTPS is active.
- SSL Checker: Use the Domain Name API SSL Checker or any online tool to verify the certificate chain, expiry date, and issuer.
- SSL Labs test: Go to ssllabs.com/ssltest and enter your domain. Aim for an A or A+ grade — anything lower usually indicates a configuration issue worth fixing.
✅ No padlock? The most common cause is an incomplete certificate chain — your intermediate (CA Bundle) certificate wasn't installed. Install it into the IIS certificate store using MMC (certlm.msc), then restart IIS.
