Unauthorized API Access Error: Causes and Fixes
Who Should Read This?
This guide is for you if you fall into one of these groups:
- Developers integrating Domain Name API's REST API directly with their own code (cURL, PHP, C#, JavaScript, Python)
- Resellers using the Domain Name API module through WHMCS, WiseCP, HostBill, Blesta, or ClientExec
- Teams integrating Domain Name API for the first time who are experienced with REST APIs in general, but new to this specific one
You might be technically experienced overall, but Domain Name API's authentication model can work a little differently than what you're used to elsewhere. That gap is exactly what this guide is here to close.
What Is a 401 Unauthorized Error?
HTTP 401 Unauthorized is a standard client error status code. It's returned when a request you send to an API gets rejected at the authentication stage. In plain terms: the server received your request, but couldn't verify who you are.
It has nothing to do with the content of the request — which domain you're checking, which operation you're trying to run. It's about your credentials. In the context of Domain Name API, this almost always means the Reseller ID and API Key combination you sent wasn't accepted as valid.
401 Unauthorized vs. 403 Forbidden: What's the Difference?
These two get mixed up constantly because both mean a request was rejected. But under the HTTP standard, there's a real distinction: 401 means your identity couldn't be verified; 403 means your identity was verified, but you don't have permission for that specific action.
How Authentication Works in Domain Name API
Every request you send to Domain Name API's REST API needs two pieces of information together for the system to know who you are: your Reseller ID and your API Key. Both go together on every single request; if either one is wrong, the request gets rejected, even if the other one is perfectly correct.
Reseller ID and API Key
Reseller ID: a unique value that identifies which reseller account a request is acting on behalf of.
API Key: the authentication credential used to access that account.
You can find both on Reseller Settings > Integration Details in your panel, and resend them to your registered email at any time using the “Send Details via Email” button.
Live and Test Environments: Two Separate API Keys
On the Integration Details page, you'll see two distinct keys: a Live Environment API Key and a Test Environment API Key. The live key is for real domain operations and gets billed against your reseller balance; the test key is for development and integration testing — it's free and doesn't create real registrations.
Request Volume: Standard API vs. Bulk API
This isn't directly a 401 issue, but it's a closely related one worth not confusing: Domain Name API provides /api for real-time, user-triggered requests, and a separate /api-bulk endpoint for automated, high-frequency requests, with a limit of 1 request per second per API Key. Exceeding that limit returns 429 Too Many Requests, not 401 — so don't mistake a rate-limit issue for a credentials issue. If you're seeing 429, the problem is your request frequency, not your credentials.
IP Whitelist: An Additional Security Layer
Even with a correct Reseller ID and API Key, a request can still be rejected if it's coming from a server IP that isn't on your account's IP Whitelist. We'll walk through exactly where to add an IP, with real panel screenshots, later in this guide.
The First 5 Common Causes
These five account for the large majority of Unauthorized errors. For each one, we cover the symptom, the cause, and the fix. The remaining causes (Authorization header mistakes, outdated modules, copy-paste errors, and more) are covered further down.
1) Wrong or Missing API Key
Symptom: Every request fails with Unauthorized, regardless of which domain or operation you're trying.
Cause: The API Key entered in your module or code doesn't match the current value in your panel. This usually comes from a partially copied key, an old key that's still in use, or an application that wasn't updated after the key was rotated.
Fix: Copy the current API Key from Integration Details, and make sure you're using the one that matches the environment (Live/Test) you're actually calling.
2) Wrong Reseller ID
Symptom: The error persists even though the API Key is correct.
Cause: The Reseller ID is just as critical as the API Key — the system uses it first to figure out which account you're acting on behalf of. An incorrect or outdated Reseller ID invalidates the request even when it's paired with a perfectly valid API Key.
Fix: Verify your Reseller ID on the Integration Details page, especially if you've recently gone through an account migration — that value can change.
3) An Email Address Typed Into the Reseller ID Field
Symptom: The username field in your module or code contains your panel login email.
Cause: This is, by a wide margin, the single most common authentication error we see. Some users fill the “Username” field with the email address they use to log into the panel, but Domain Name API expects a Reseller ID there, not an email. We cover this in more depth in our dedicated guide on the related “Reseller Not Found” error.
Fix: Replace the email address with the real Reseller ID from the Integration Details page.
4) Server IP Not Added to the IP Whitelist
Symptom: Credentials check out fine, but the error persists — especially after moving to a new server or adding a layer like Cloudflare or a load balancer.
Cause: Your Reseller ID and API Key can be used alongside the IP Whitelist feature. If the whitelist is active and the request's IP isn't on it, the request gets rejected even with otherwise-correct credentials.
Fix: Add your server's current outbound IP under Reseller Settings > Reseller Configuration > IP Whitelist. We'll walk through this step by step, with screenshots, right below.
5) Live / Test Environment Mismatch
Symptom: Some requests work, others return Unauthorized; or an integration that worked fine in testing breaks the moment it goes live.
Cause: Sending a Test Environment API Key to the Live endpoint (or the reverse) gets rejected even though the key itself is valid — it's just not valid for that endpoint.
Fix: Confirm which environment your API Key belongs to (listed separately as Live/Test on the Integration Details page) and make sure your code's endpoint matches that environment.
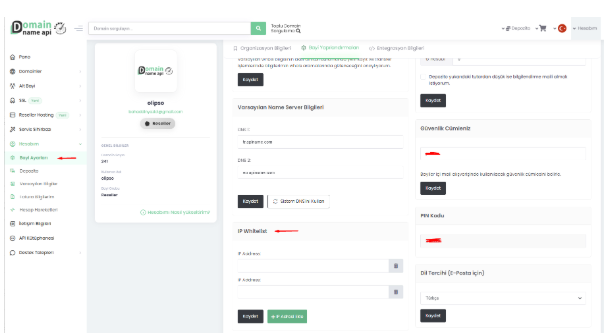
IP Whitelist: Where and How to Add an IP
Cause #4 above — a server IP missing from the Whitelist — is both the easiest cause to fix and the easiest one to forget about. Even flawless Reseller ID and API Key values won't help if the Whitelist is active and your request's IP isn't on it. Here's exactly where to find it and how to add an IP, based on the real panel.
Step by Step: Adding an IP to the Whitelist
- Log in to your reseller panel.
- Open the My Account menu in the left sidebar.
- Click Reseller Settings.
- On the page that opens, select the Reseller Configuration tab.
- Scroll down; you'll find the IP Whitelist section underneath the Default DNS Information block.
- In the “IP Address” field, enter the public outbound IP address of the server that will be sending API requests.
- If you're sending requests from more than one server, click “+ Add IP Address” to open another row and enter the next IP.
- Click Save.
Removing an IP From the List
Click the trash icon next to any IP row, then click Save to remove that IP from the whitelist.
How Do You Find the Right IP?
If your code runs directly on your own server (VPS, dedicated, or shared hosting), you need that server's public IP address. You can typically find this from a terminal using any general-purpose IP lookup command.
If your server sits behind NAT (Network Address Translation) — meaning multiple servers or devices share the same outbound connection — the IP you need to whitelist is the NAT's shared public IP, not your server's private/internal IP.
If you're using Cloudflare, a load balancer, or a reverse proxy, you'll need to confirm which IP your request actually reaches Domain Name API from — this can be different from the IP your own browser shows you.
What Happens When Your IP Changes?
Cloud providers (AWS, Google Cloud, Azure, etc.) can assign dynamic IPs in some configurations; a server restart or an auto-scaling event can change your outbound IP. The moment that happens, your old whitelist entry stops matching, and every request starts failing with Unauthorized again — even though your Reseller ID and API Key never changed at all.
To avoid this, use a static or elastic IP where possible (for example, your cloud provider's Elastic IP feature), and if your IP can change, build a habit of checking the whitelist is still current.
The Remaining Common Causes (6–10)
6) A Missing or Incorrect Authorization Header
Symptom: The request looks correct overall, but still gets rejected at the authentication step.
Cause: Many developers copy a generic authentication pattern they've used with other REST APIs and apply it here as-is. Exactly which field Domain Name API expects in the header versus the request body can vary by endpoint.
Fix: Check the Production Swagger documentation (api.domainresellerapi.com/swagger) or the Test/OT&E documentation (ote.domainresellerapi.com/swagger) for the exact field names expected by the specific endpoint you're calling.
7) Trying Bearer Token Auth Out of Habit
Symptom: You've added an Authorization: Bearer <token> header, and you're still getting Unauthorized.
Cause: Bearer tokens are standard for plenty of modern REST APIs, but that doesn't mean they match Domain Name API's authentication model. Your Reseller ID and API Key need to be sent in the format the specific endpoint expects (header, body, or query parameter, depending on the endpoint); adding a generic Bearer header on top doesn't change that — it's just an extra header that does nothing.
Fix: Remove the Bearer header and follow the exact request format shown in the Swagger documentation.
8) An Outdated Module Version
Symptom: You're running WHMCS, WiseCP, HostBill, Blesta, or ClientExec, and the error started after (or without) an update.
Cause: An old module version can send your credentials in a format or under a parameter name the API no longer expects.
Fix: Download the current module version for your panel from the domainreseller GitHub organization (github.com/domainreseller), reinstall it, and re-save your Reseller ID and API Key.
9) A Copy-Paste Error or Invisible Character
Symptom: The credentials look correct at a glance, but keep getting rejected.
Cause: Copying an API Key or Reseller ID can introduce an extra space or an invisible character before or after the value. It looks identical on screen but is invalid to the system.
Fix: Copy the value again directly from the panel and paste it straight into the field; if you're unsure, type it manually instead.
10) The Wrong Content-Type Header
Symptom: The request body looks right, but the server seems to fail to parse it at all.
Cause: Sending a JSON-formatted request body with a mismatched Content-Type header (for example, sending JSON while the header still says application/x-www-form-urlencoded) can prevent the server from reading your credentials correctly at all.
Fix: Verify the actual Content-Type your HTTP client is sending using a network inspection tool (browser dev tools or Postman work well) and compare it against what the Swagger documentation expects.
Code Examples: cURL, PHP, C#, JavaScript, Python
Domain Name API's official documentation confirms that your credentials (Reseller ID and API Key) must be sent together with every request, but the exact field names — and whether they belong in a header, the body, or a query parameter — are defined per endpoint in the interactive Swagger documentation. For that reason, we're keeping the examples below intentionally at the template level; please confirm the exact field names against your own Swagger docs (Production: api.domainresellerapi.com/swagger, Test/OT&E: ote.domainresellerapi.com/swagger). That's a far safer bet than us inventing a header name that turns out to be wrong and costs you debugging time.
cURL
# Replace these field names with whatever your own Swagger docs
# specify (could be a header, body field, or query parameter)
curl -X POST "https://api.domainresellerapi.com/.../checkdomain" \
  -H "Content-Type: application/json" \
  -d '{
    "resellerId": "YOUR_RESELLER_ID",
    "apiKey": "YOUR_API_KEY",
    "domain": "exampledomain.com"
  }'
PHP
// Read credentials from environment variables, never hard-code them
$resellerId = getenv('DOMAINNAMEAPI_RESELLER_ID');
$apiKey     = getenv('DOMAINNAMEAPI_KEY');

// Confirm exact field names against your own Swagger documentation
$payload = [
    'resellerId' => $resellerId,
    'apiKey'     => $apiKey,
    'domain'     => 'exampledomain.com',
];

$response = $client->checkDomain($payload);
C#
// Read credentials from environment variables or a secrets store
var resellerId = Environment.GetEnvironmentVariable("DOMAINNAMEAPI_RESELLER_ID");
var apiKey     = Environment.GetEnvironmentVariable("DOMAINNAMEAPI_KEY");

// Confirm field names and placement (header/body) against
// your own Swagger documentation
var payload = new {
    resellerId = resellerId,
    apiKey = apiKey,
    domain = "exampledomain.com"
};
JavaScript (Node.js)
// Read credentials from your .env file
const resellerId = process.env.DOMAINNAMEAPI_RESELLER_ID;
const apiKey = process.env.DOMAINNAMEAPI_KEY;

// Confirm exact field names against your own Swagger documentation
const payload = {
  resellerId,
  apiKey,
  domain: "exampledomain.com",
};
Python
import os

# Read credentials from environment variables
reseller_id = os.environ.get("DOMAINNAMEAPI_RESELLER_ID")
api_key = os.environ.get("DOMAINNAMEAPI_KEY")

# Confirm exact field names against your own Swagger documentation
payload = {
    "resellerId": reseller_id,
    "apiKey": api_key,
    "domain": "exampledomain.com",
}
Why Not Just Give One Final, Copy-Pasteable Example?
Because inventing a header or field name and presenting it as the “official” example would cost you real debugging time on your actual integration — which defeats the entire point of this guide. For a complete, account-specific request that's guaranteed to match what your endpoint expects, the Swagger documentation (api.domainresellerapi.com/swagger or ote.domainresellerapi.com/swagger) is the most reliable source.
5-Minute Quick Fix Checklist
Work through this list before opening a support ticket; it resolves most cases on its own:
- Is the API Key copied correctly, and does it match the environment (Live/Test) you're calling?
- Is the Reseller ID correct and current?
- Did an email address end up in the username field by mistake?
- Are your Live and Test environment credentials mixed up?
- Is your server's current outbound IP listed on the IP Whitelist?
- Has your server or cloud provider's IP changed recently (restart, auto-scaling, provider switch)?
- Do your request's field names and headers match the Swagger documentation?
- Is the module you're using (WHMCS/WiseCP/HostBill/Blesta/ClientExec) on its current version?
Security Recommendations
The following practices — also reflected in Domain Name API's own API key security guidance — are the baseline for keeping your credentials safe:
- Store your API Key in environment variables (.env); never hard-code it into source code.
- Use IP Whitelisting wherever possible to restrict API calls to trusted servers.
- Rotate your API Key on a regular basis.
- Don't share the same API Key across multiple applications or teams.
- Never share your API Key over email, chat apps, or screenshots.
- Add files containing your API Key to .gitignore so they never end up in a public repository.
Related Resources
Other guides closely related to this error, already live on the knowledge base:
- Reseller Not Found Error Explained
- Post-Migration WHMCS, WiseCP, HostBill, Blesta & ClientExec Configuration Guide
- Domain API Rate Limit, Throttling & Bulk Usage Policy
Frequently Asked Questions
Why am I getting a 401 Unauthorized error?
It means the Reseller ID and API Key combination you sent wasn't accepted as valid. The most common causes are incorrect or missing credentials, an email address typed into the Reseller ID field, and a server IP that isn't on the Whitelist.
What's the difference between 401 and 403?
401 means your identity couldn't be verified; 403 means your identity was verified, but you don't have permission for that action. In Domain Name API, credential issues are practically always seen as 401.
Should I use Bearer token authentication?
Adding a generic Bearer header doesn't change anything on its own. Your Reseller ID and API Key need to be sent in the exact format the endpoint expects, which is defined in the Swagger documentation.
How do I rotate my API Key?
You can view your current key on the Integration Details page. If you believe it's been compromised, contact support to request a rotation.
Where do I find my Reseller ID?
Go to My Account > Reseller Settings > Integration Details in your panel. You can also have it resent to your registered email via “Send Details via Email.”
What happens if I leave the IP Whitelist completely empty?
This behavior isn't explicitly documented in the sources we used. We'd recommend confirming with support before clearing your list entirely.
I'm behind Cloudflare — which IP should I whitelist?
You need to confirm which IP your request actually reaches Domain Name API from; this can differ from the IP shown in your own browser.
I'm behind NAT. What IP do I need to add?
The IP you whitelist should be the NAT's shared public IP, not your server's private/internal IP.
Does using a load balancer affect this?
Yes; you'll need to determine which public IP your request uses when it leaves the load balancer, and whitelist that one.
Can I use IP Whitelisting on shared hosting?
Yes, but your outbound public IP on shared hosting can vary or be shared with other tenants depending on your provider; confirm your server's fixed public IP with your host.
Why isn't my WHMCS module working?
The same root causes apply: wrong Reseller ID/API Key, a missing IP Whitelist entry, or an outdated module version. Update to the current module version and re-save your credentials.
Why isn't my WiseCP module working?
The same authentication logic applies in WiseCP; make sure the Reseller ID is in the username field and the API Key is in the password field, not swapped.
Is Authentication Failed the same as Unauthorized?
In practice, it points to the same root cause: authentication failed. The exact message text can vary by endpoint, but the fix is the same.
Is Unauthorized the same as Invalid API Key?
They're closely related but not identical. Invalid API Key points specifically to the key being invalid; Unauthorized/Access Denied is a broader authentication rejection that can also cover a wrong Reseller ID or a missing IP Whitelist entry.
My code works in the test environment but breaks in production — why?
This is usually a Live/Test key or endpoint mismatch. Confirm the environment your key belongs to matches the endpoint you're calling.
Does updating my module change my Reseller ID or API Key?
No. A module update only changes the connection layer between your panel and the API; your credentials are unaffected.
Is 429 Too Many Requests the same as 401 Unauthorized?
No. 429 means you've exceeded the rate limit (1 request per second per API Key); it has nothing to do with your credentials. 401 is specifically an authentication problem.
I send requests from multiple servers — do I need to whitelist each one?
Yes. If the IP Whitelist is active, every server sending requests needs its outbound IP added to the list.
I accidentally shared my API Key — what should I do?
Contact support immediately, request a key rotation, and update every application using the old key.
Is testing in the sandbox required?
It's not mandatory, but strongly recommended. The test environment doesn't create real registrations or incur charges, letting you validate your integration safely before going live.
Conclusion
An Unauthorized error means Domain Name API couldn't verify the credentials you sent — it's not a server problem and it's not about the domain you're working with. The fix is always found in three places: your Reseller ID, your API Key, and your IP Whitelist. Work through this guide in order — credentials first, then environment (Live/Test), then IP Whitelist — and you'll usually have it resolved in a few minutes.
If the error persists after all of the above, reaching out to our support team with your request logs attached is the fastest path to a fix.
Build a Secure Integration with Domain Name API's REST API
- Free reseller account, with no activation fee and no minimum deposit
- A sandbox (Test/OT&E) environment to test risk-free
- REST API alongside ready-made modules for WHMCS, WiseCP, HostBill, Blesta, and ClientExec
- Infrastructure trusted by 40,000+ resellers in 200+ countries
- 24/7 technical support via ticket, phone, and live chat
If you run into anything during integration, our technical team is glad to help.
