Add Your First Customer: How to Create a cPanel Account in WHM
The short answer
To add your first customer, you create a cPanel hosting account for them in WHM > Account Functions > Create a New Account. Enter the customer's main domain, a cPanel username, a strong password, and a contact email address; choose the hosting package you created earlier; check the DNS and Mail Routing settings; then click Create.
This creates your customer's actual cPanel account. The WHM package you choose sets that account's disk, bandwidth, email, and other resource limits.
Haven't created a hosting package yet?
You'll choose a package while creating the account. If you don't have one yet, start with Create Your First Hosting Package: How to Add a Package in WHM.
Who this guide is for: cPanel Reseller Hosting users who have created their first package and are opening their first customer's account. Last updated: October 4, 2026 Source: official cPanel & WHM documentation (version 138 and later)
The Short Version: Add Your First Customer in 7 Steps
- Log in to WHM.
- Open WHM > Account Functions > Create a New Account.
- Enter the customer's domain.
- Set a username, a strong password, and a contact email.
- Choose the hosting package the customer bought.
- Check the DNS and Mail Routing settings.
- Click Create, then test access to cPanel.
Hands-on time: A few minutes if the customer details and package are ready. Getting the site to load on the domain depends on DNS and can take longer.
Where should you start?
Ready to create the account now? Create Your Customer's Account
Not sure which package to choose? Step 7: Choose the Right Package for Your Customer
Want to understand the DNS and email settings? Step 8: DNS and Mail Routing
Can't create the account? If You Can't Create a New cPanel Account
What Does “Adding a Customer” Mean in WHM?
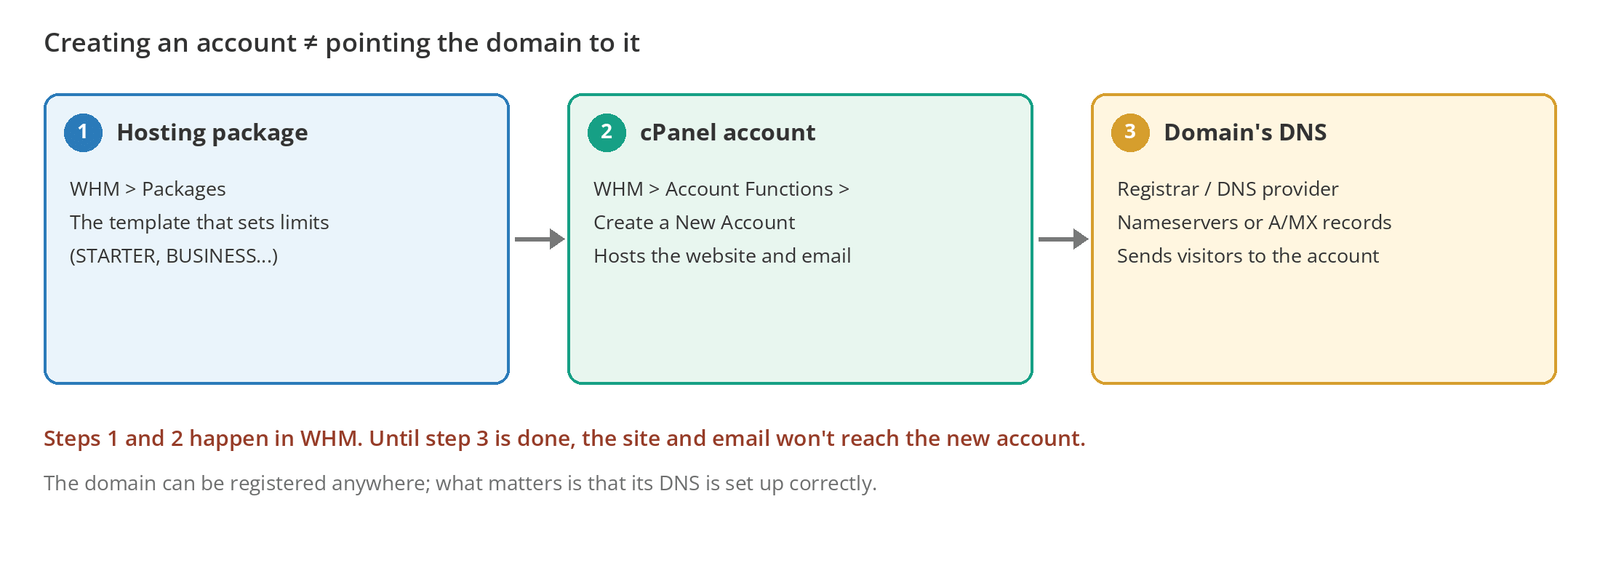
In WHM, adding a customer means creating a cPanel hosting account tied to that customer's domain. WHM doesn't create customer (CRM) records, invoices, or payments; those are handled in billing systems such as WHMCS or WiseCP.
Create a New Account prepares the account that will host the customer's website, email, and databases. Sending the domain's visitors to that account is a separate step: the domain's DNS settings.
Before You Start
| Requirement | |
|---|---|
| ☐ | An active Linux cPanel Reseller Hosting plan and your WHM login details |
| ☐ | The customer's main domain (for example, example.com) |
| ☐ | A contact email address the customer can actually reach |
| ☐ | The hosting package that matches what the customer bought |
| ☐ | A decision on which nameservers or DNS provider the domain will use |
| ☐ | Enough capacity on your reseller account for a new account |
The domain can be registered anywhere
The customer's domain doesn't have to be registered with Domain Name API. You can create an account for a domain registered with any company. For the site to load from this account, you'll need to set up the domain's DNS separately.
Create Your Customer's Account
Step 1: Log In to WHM
Log in with your reseller username and password, using the address from your activation email and service details:
https://<your-WHM-server-address>:20872087 is WHM's secure port. 2083 is the port your customer uses to log in to their own cPanel.
Step 2: Open Create a New Account
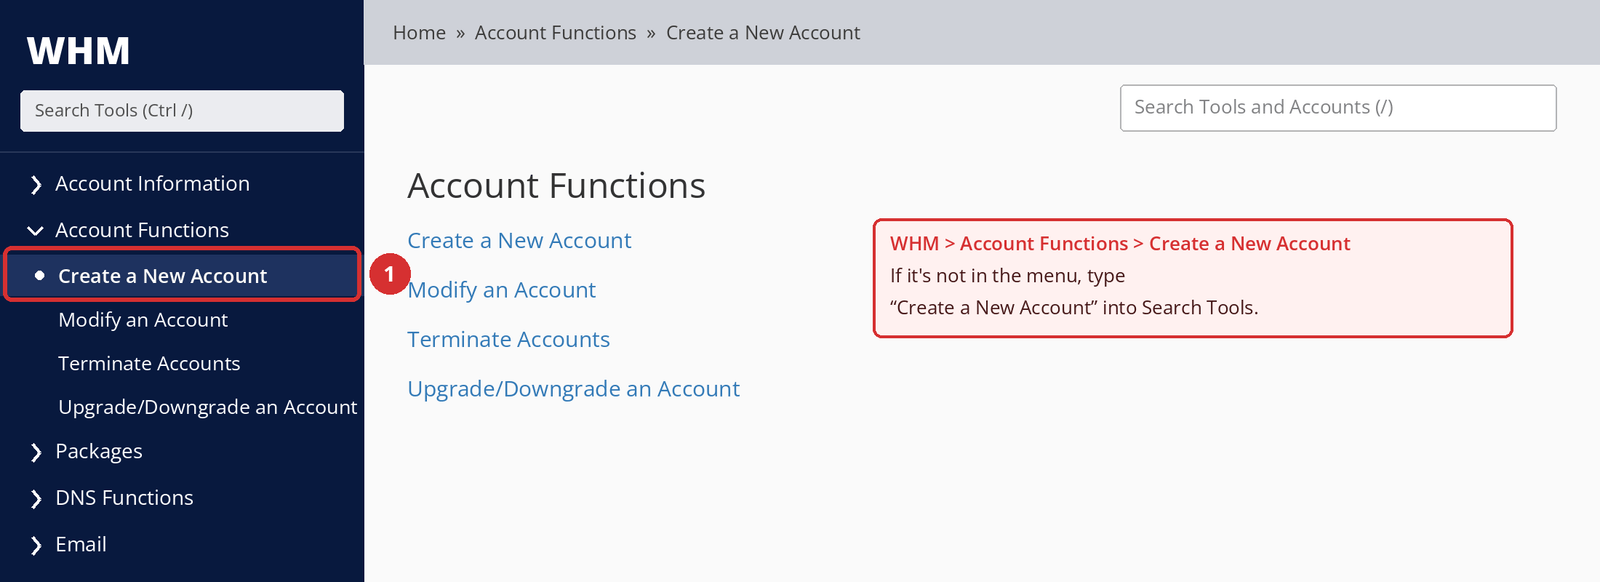
In the left menu, expand Account Functions and click Create a New Account, or type Create a New Account into Search Tools at the top left.
Can't see the screen?
cPanel notes that hosting providers can enable or disable Create a New Account for reseller accounts. If it's not in your menu, contact our support team. Even if the screen is available, you can't create new accounts once you've reached your account creation limit.
Step 3: Enter Your Customer's Domain
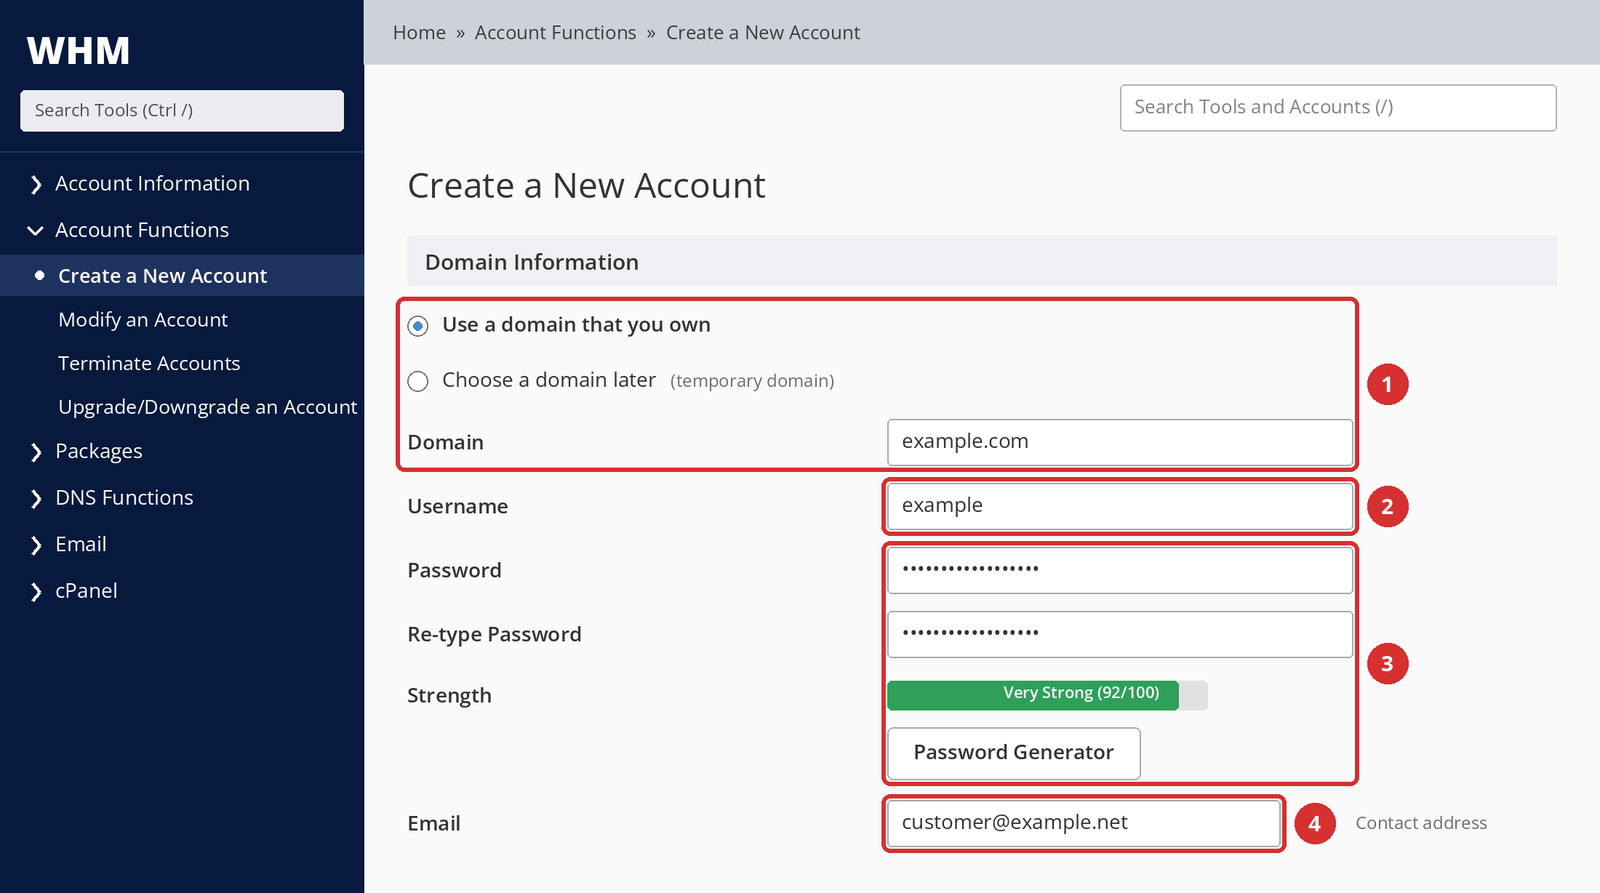
In Domain Information, select Use a domain that you own and enter the customer's main domain in Domain: example.com.
- Don't include www. cPanel doesn't allow a separate account for the www. subdomain and removes it from the account name automatically. Just enter
example.com. - It doesn't matter where the domain is registered. You can create the account even if the domain is with another company.
- DNS not pointing here yet won't stop you. The account is created; the site loads from it once the domain's DNS is set up correctly.
If the domain isn't ready yet, you may see Choose a domain later (a temporary domain). Because it comes with email and DNS restrictions, it isn't recommended for real customer accounts; see What Is a Temporary Domain?.
Step 4: Choose a Username
The Username is the name your customer uses to log in to cPanel. A practical approach is a short name based on the domain, such as example for example.com.
If WHM rejects the username, it's usually because of one of these rules:
| Rule | Example |
|---|---|
| Must be unique and 16 characters or fewer. | example works; it's rejected if the name already exists on the server. |
| Lowercase letters and numbers only. | Example, ex-ample, or exämple won't work. |
| Can't start with a number or with “test”. | 1example and testsite won't work. |
| If MySQL or PostgreSQL is used, the first 8 characters must be unique. | examplecorp1 and examplecorp2 may clash. |
Whether you can change a username later depends on your account's permissions, and it can affect settings tied to the username, such as database names. Pick a lasting one from the start.
Step 5: Create a Strong Password
Click Password Generator to create a strong password, and enter the same password in Re-type Password. The Strength meter scores passwords out of 100; when it turns green, the password meets the server's minimum strength requirement.
- Use a different password for every customer.
- Avoid predictable passwords based on the domain, company name, or year.
- Don't email the password to your customer in plain text. See What Should I Send to My Customer? for safer options.
Step 6: Enter Your Customer's Contact Email
The Email field is the cPanel account's contact email address. It doesn't create a new email account (mailbox) on the customer's domain.
Typing info@example.com here doesn't create a mailbox
Enter an address your customer can reach right now, such as a business address on another domain or a personal email address.
Email on the customer's new domain may not be working yet. If you use an address on that domain here, account notifications may never reach the customer. Mailboxes are created in cPanel after the account is set up.
Step 7: Choose the Right Package for Your Customer
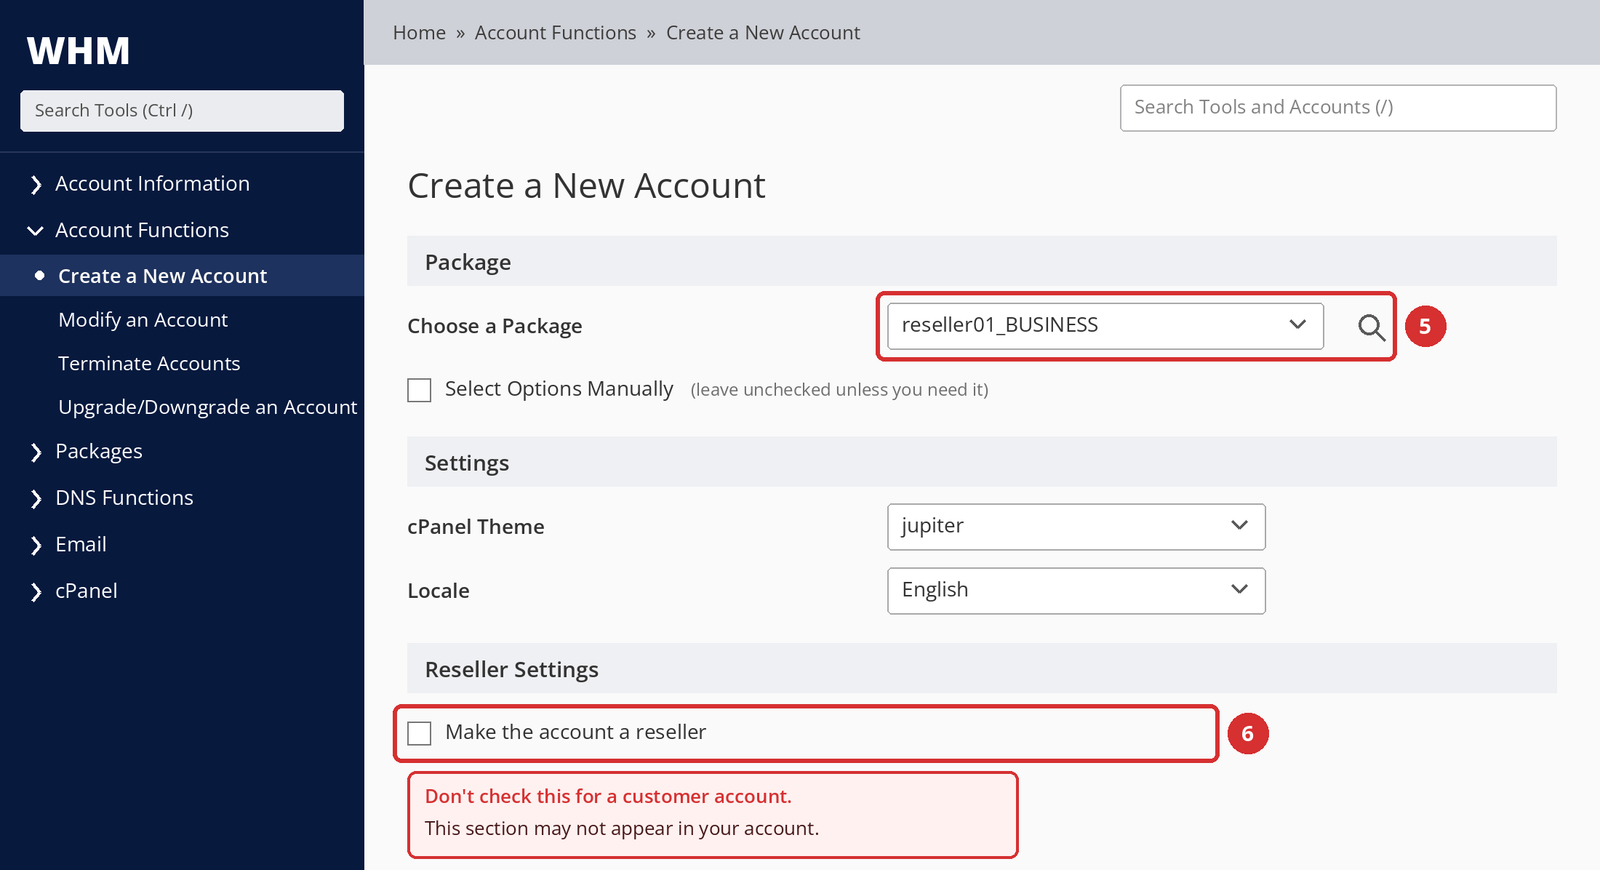
In the Package section, choose the package that matches what the customer bought from Choose a Package. The package sets the disk, bandwidth, email, database, and addon domain limits, and which cPanel features the account can use. To preview a package's settings, hold your cursor over the magnifying glass icon next to the menu.
Wrong package, wrong limits
If the customer bought BUSINESS and you accidentally choose STARTER, the account is created with STARTER limits. It usually comes to light when the customer hits a disk or email limit. Check the package against the order before you choose.
- Select Options Manually: Lets you change the package values for this account only. Standard packages are easier to manage and keep your WHMCS/WiseCP mapping consistent; use this only for a specific customer need. If your account doesn't have account modification permission, choosing a package is required and this option may not be available.
- Settings: The cPanel theme and language (Locale) come from the package. Everything in this section can only be edited when Select Options Manually is checked.
- Make the account a reseller: Leave this unchecked for a customer account. It creates a new reseller account; your goal here is a cPanel account for a customer. This section may not appear in your account at all, which is normal.
Step 8: Check the DNS and Mail Routing Settings
The DNS Settings and Mail Routing Settings sections decide how DNS records and email delivery are set up for the account's domain. For your first account, you can leave most settings at their defaults; just watch the two points below.
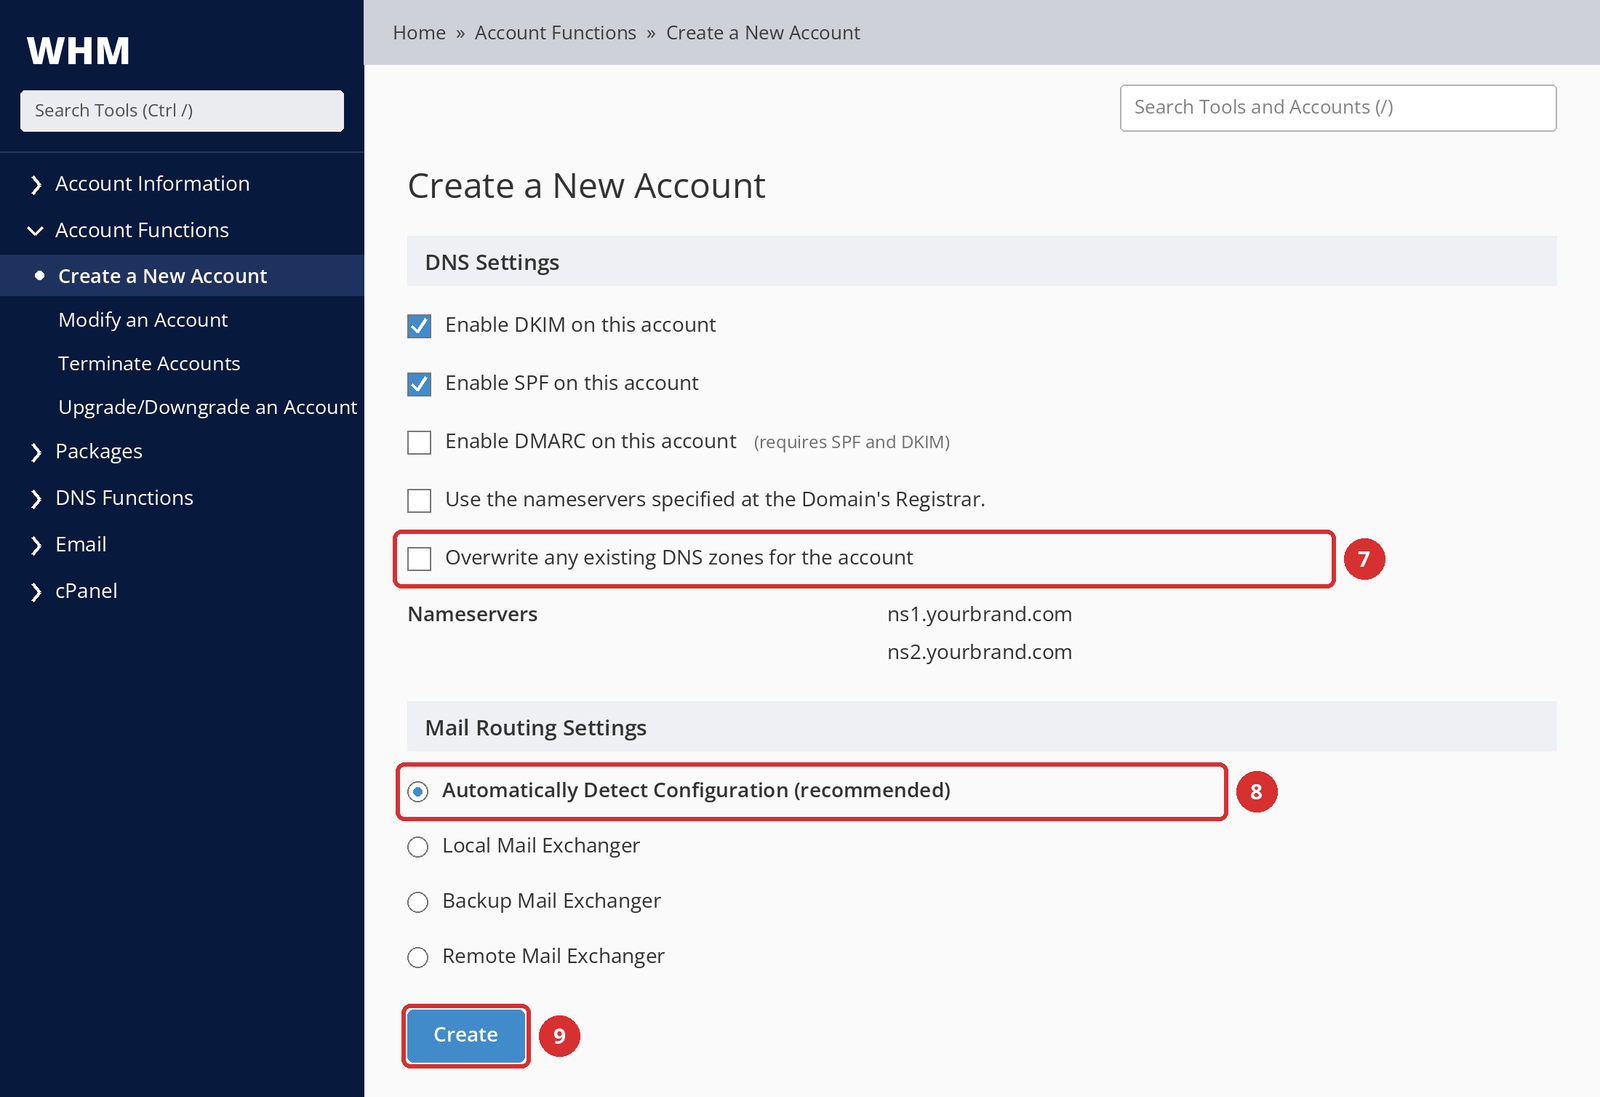
Don't check Overwrite any existing DNS zones unless you know why
If a DNS zone for the same domain already exists on the server, this option overwrites it. Web, email (MX), and custom DNS records in that zone may be lost.
If you get an error such as “domain already exists,” don't check this box to get past it; see If You Can't Create a New cPanel Account first.
| Setting | When to use it |
|---|---|
| Enable DKIM / Enable SPF | Reduces the chance of email being marked as spam. Leave it at your provider's default. |
| Enable DMARC | Can be enabled when SPF and DKIM are on. The default policy only monitors (p=none). |
| Use the nameservers specified at the Domain's Registrar | When the domain will keep using another DNS setup. If you're not sure, leave it unchecked. |
| Mail Routing | Use cPanel's recommended Automatically Detect Configuration. If the customer uses Google Workspace or Microsoft 365, see Mail Routing: Which Option?. |
Step 9: Create the Account
Check the details one last time and click Create at the bottom of the page. WHM shows a confirmation message with the account's settings.
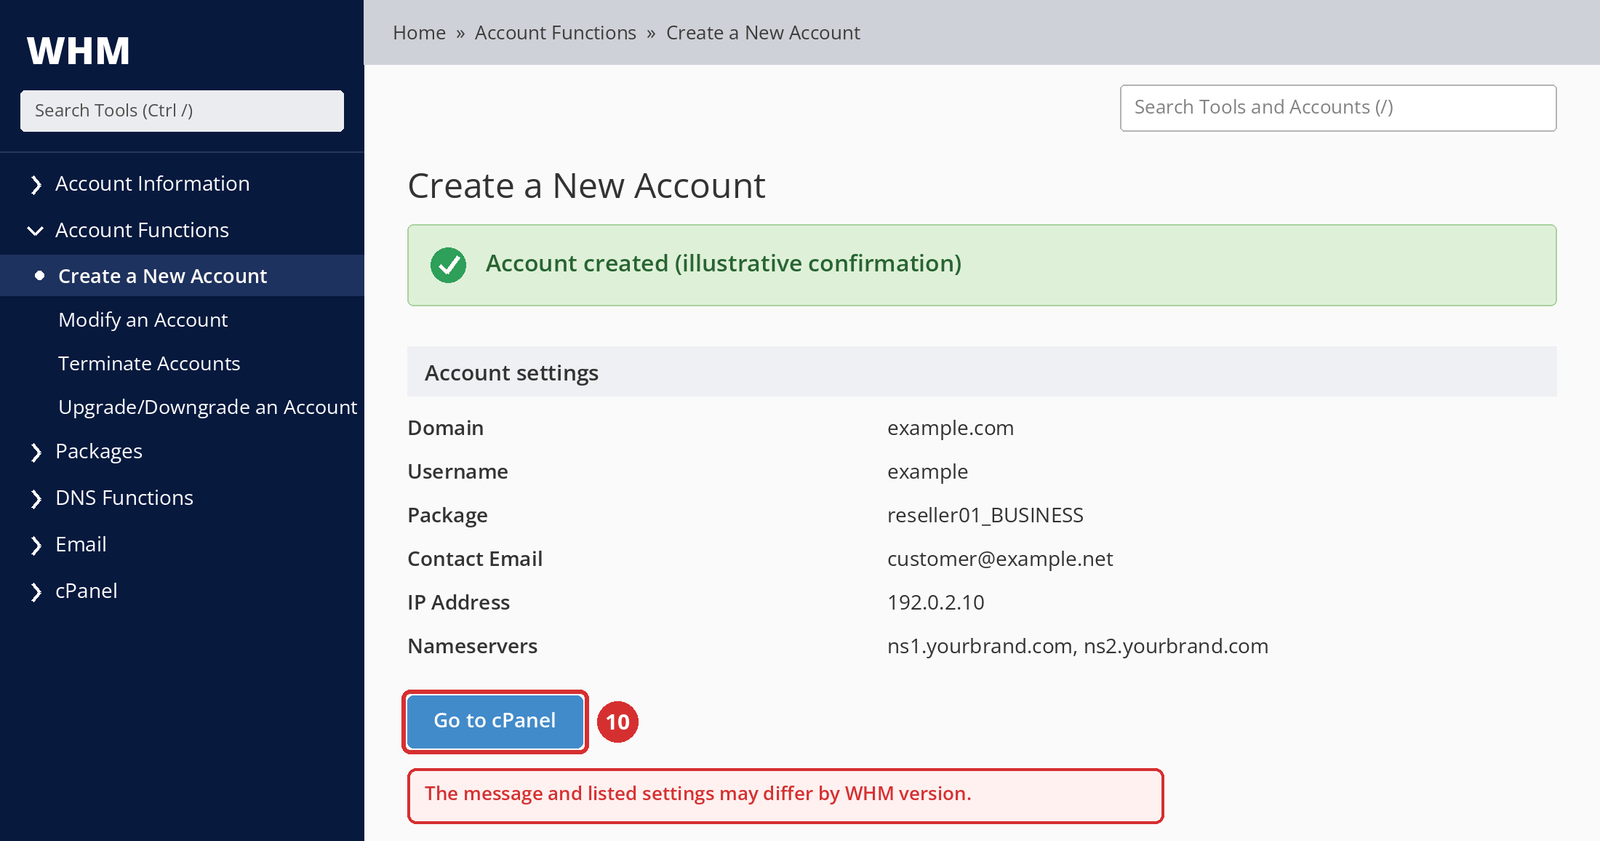
Checkpoint
Expected result: The confirmation shows the correct domain, username, and package.
Most common mistake: Assuming you're done once you see the confirmation. Check in cPanel that the account has the right limits, and set up the domain's DNS.
Next: Open the account with Go to cPanel and check it.
Step 10: Check Your Customer's cPanel
Click Go to cPanel on the confirmation screen and check the following in the customer's cPanel:
- Is the main domain correct?
- Do the disk, email account, and database limits match the package the customer bought?
- Are the tools the customer will use (File Manager, email, databases) visible?
- Is there a
public_htmlfolder in File Manager? That's where the site's files go.
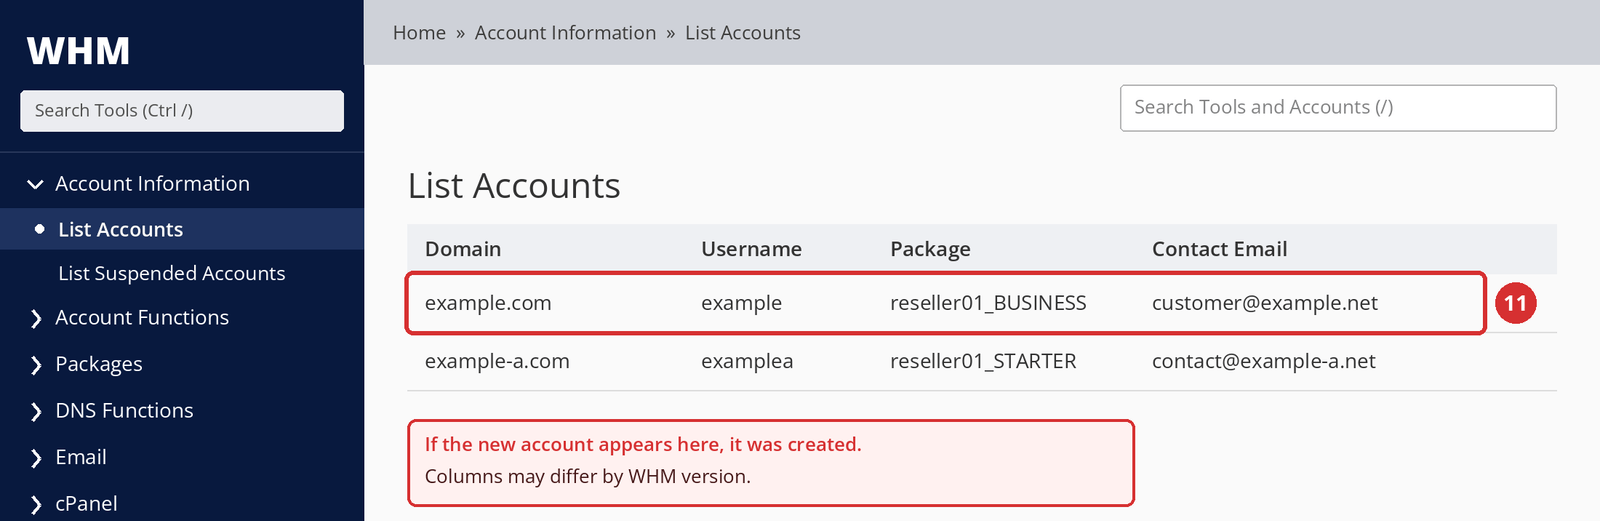
Step 11: Confirm the Account in List Accounts
In WHM > Account Information > List Accounts, check that the new account is listed with the correct package. You'll manage your customer accounts from here later, too.
Account created? The next critical step is pointing the domain to this account and handing it over to your customer securely.
After the Account Is Created
Does the Domain Point to the New Hosting Automatically?
Not always. Creating a cPanel account in WHM prepares the hosting environment; for visitors to reach it, the domain's DNS or nameserver settings must also be set up correctly. If the domain uses other nameservers, the site won't load from the new account even though it was created successfully.
| Scenario | What to do |
|---|---|
A. The domain will use your nameservers (e.g., ns1.yourbrand.com, ns2.yourbrand.com) | Change the nameservers to these names at the company where the domain is registered. DNS records are then managed on the hosting server. |
| B. The domain stays with its current DNS provider | Update the A record for the website, the MX records for email, and any other records at that provider to match the hosting account. |
For details, see: How to Set Up Private Nameservers for cPanel Reseller Hosting, How to Change Nameservers, and How to Manage DNS Records.
If the Website Doesn't Load Right Away
A site that won't load can be caused by three different situations, and each has a different fix.
| Situation | How to tell | What to do |
|---|---|---|
| 1. The account wasn't created | It's not in List Accounts. | Run Create again and check the error message. |
| 2. The account exists but DNS is wrong | The domain points to another server or doesn't resolve. | Check the domain's nameservers or A record. |
| 3. DNS is right but there's no content | A default cPanel page appears. | The account works; upload the site's files to public_html. |
DNS changes don't appear for everyone at once. Internet providers and DNS resolvers cache records for a set time (the TTL); as those caches expire, people start seeing the new records. So it's normal to see different results on different networks for a while after a change.
What Should I Send to My Customer?
Once the account is created, let your customer know the hosting is active, and share the domain, the package name, how to log in to cPanel, any DNS instructions, and how to reach your support. Don't send the password in a plain-text email.
| Information | Note |
|---|---|
| That hosting is active, and the package name | For example: “Your BUSINESS plan is active.” |
| Domain | The main domain the account was created for. |
| cPanel login address and username | The login address looks like https://<server-address>:2083. |
| Password | Send it through a separate, secure channel, or ask the customer to change it on first login. |
| Nameserver or DNS instructions | If the domain is with another company, spell out exactly what to change. |
| Your support channel | How to reach you if something goes wrong. |
More Details
What Is a Temporary Domain?
A temporary domain is an automatically generated cpanel.site address that cPanel uses when you create an account without a registered domain. It's useful for designing and testing a site, but it doesn't replace a real customer domain.
- Accounts with a temporary domain can't use email services.
- You can't edit the DNS of a temporary domain.
- Search engines don't rank temporary domains; they can't be used for SEO.
- An existing account can't be switched to a temporary domain. An account with a temporary domain can be moved to a registered domain in WHM > Account Functions > Modify an Account.
- The option depends on your WHM version and server settings and may not appear in your account.
What Are SPF, DKIM, and DMARC?
SPF defines which servers can send email on behalf of a domain. DKIM adds a digital signature to outgoing email that recipients can verify. DMARC is a policy that tells receiving servers how to handle email based on the SPF and DKIM results.
Together, they reduce the chance of email being marked as spam. According to cPanel, DMARC requires valid SPF and DKIM records, so DMARC can't be enabled until SPF and DKIM are. You can customize the records later in cPanel > Zone Editor.
Mail Routing: Which Option?
Mail Routing decides whether the hosting server accepts the domain's incoming email itself or leaves it to another server. cPanel recommends Automatically Detect Configuration for most cases.
| Option | What it does | When |
|---|---|---|
| Automatically Detect Configuration | Picks the right setting automatically based on the domain's DNS. | Default and recommended. |
| Local Mail Exchanger | Accepts email on this server. | When mailboxes will live in this hosting account. |
| Backup Mail Exchanger | Sets the server up as a backup mail server. | When the main email is elsewhere and this server is a backup. |
| Remote Mail Exchanger | Doesn't accept email on this server. | When email runs entirely on another service. |
Customers using Google Workspace or Microsoft 365
If the site is on your server but email runs on an external service such as Google Workspace or Microsoft 365, having the server look for mail locally (Local) can cause messages to be delivered to the wrong place. In this setup, you usually need Remote Mail Exchanger.
Before deciding, make sure the domain's MX records actually point to the external service. You can also check and change this after the account is created in cPanel > Email Routing.
Advanced Settings: Dedicated IP, Shell Access, CGI
These settings can only be edited when Select Options Manually is checked, and unless there's a business need, they should stay at the package or provider defaults.
- Shell Access: Gives the customer command-line access to the server. Don't enable it without a real need and a customer you trust.
- Dedicated IP: Assigns the account an IP that isn't shared. Don't use it if your shared reseller service doesn't include dedicated IPs. The idea that a dedicated IP is needed for SEO is a common myth.
- CGI Access and Digest Authentication: Leave them at the package or provider defaults.
Why Can't I Create a New Account? Account Creation Limits
Reseller accounts work within limits set by the hosting provider. According to cPanel, a reseller who is over their account creation limit can't create new accounts.
The limit can be based on the total number of accounts or on the total disk and bandwidth allocated to your reseller account. For example, once you reach the number of accounts your plan allows, you can't create the next customer. Deleting unused test accounts can free up room; if you need more, talk to our support team about upgrading your plan. You can see current plan capacities on the Reseller Hosting page.
If You Can't Create a New cPanel Account
Troubleshooting
| Problem | Likely cause | What to do |
|---|---|---|
| Create a New Account isn't visible | Your provider may have disabled this screen for your reseller account. | Ask our support team about your account's permissions. |
| Account creation limit reached | Your reseller account has reached its allowed number of accounts or resource limit. | Check your usage; upgrade your plan if needed. |
| The username isn't accepted | It's longer than 16 characters, contains uppercase or special characters, starts with a number or “test”, or is already in use. | Pick a new name following the rules in Step 4. |
| “Domain already exists” error | The domain may already be used on the server as a main, addon, or alias domain in another account, or a DNS zone with that name may exist. | Search for the domain in List Accounts. If you can't find it, talk to our support team before checking Overwrite. |
| The package isn't in the list | It may have been created under another reseller user, or not saved. | Check the list in WHM > Packages > Edit a Package. |
| Choosing a package is required | Your account doesn't have account modification (edit-account) permission. | That's normal; choose an existing package. |
| Nameserver-related error | According to cPanel, accounts can't be created if no nameservers are set for the server. | Contact our support team; this is set on the provider's side. |
| Another error after clicking Create | The error message states the cause. | Save the full text of the message and include it in your support ticket. |
| Account created but the site won't load | DNS isn't pointing to this server, or no content has been uploaded. | Check the three situations in If the Website Doesn't Load Right Away. |
| Email isn't working | MX records, Mail Routing, or mailbox setup may be wrong; with a temporary domain, email doesn't work at all. | Check the MX records and cPanel > Email Routing; make sure the mailbox was created in cPanel. |
| Can't log in to cPanel | The username or password may be wrong, or the account may be suspended. | Confirm the username in List Accounts; reset the password from WHM if needed. |
Common Mistakes
| Mistake | Why it's a problem | What to do instead |
|---|---|---|
| Entering the domain as www.example.com | cPanel removes www.; no separate account is created. | Enter example.com only. |
| Choosing the wrong package | The account gets different limits from what was sold. | Check the package against the order. |
| Treating the Email field as a mailbox | No mailbox is created; notifications may not arrive. | Enter a reachable contact address. |
| Weak or reused password | The account's security is at risk. | Create a unique password with Password Generator. |
| Assuming the domain will point automatically | The site keeps loading from the old server. | Update the nameservers or DNS records. |
| Forgetting the nameserver change | The site and email don't reach the new account. | Plan the DNS step as soon as the account is created. |
| Wrong Mail Routing with external email | Email is looked for on the wrong server. | Check the MX records; choose Remote if needed. |
| Checking Overwrite without knowing why | Existing DNS records can be erased. | Find the cause of the conflict first. |
| Making a customer account a reseller | The customer gets far more access than needed. | Leave Make the account a reseller unchecked. |
| Enabling Shell Access unnecessarily | It increases security risk. | Enable it only when truly needed. |
| Ignoring your account limit | You can't create the next customer. | Keep an eye on your capacity. |
| Using a temporary domain as a live site | No email, no DNS editing, no SEO. | Create the account with a real domain. |
| Not testing after the confirmation | Your customer finds the problems first. | Check the limits with Go to cPanel. |
| Emailing the password in plain text | The password can be intercepted. | Use a secure channel or a password change on first login. |
Before You Hand the Account Over
| Check | |
|---|---|
| ☐ | The cPanel account was created and appears in List Accounts. |
| ☐ | The correct main domain was used (without www). |
| ☐ | The package matching the customer's purchase was assigned. |
| ☐ | The contact email is a reachable address. |
| ☐ | A strong password was created and a secure way to share it is ready. |
| ☐ | The domain's nameservers or DNS records are set up correctly. |
| ☐ | The domain points to the correct server. |
| ☐ | Mail Routing matches the customer's email setup. |
| ☐ | SPF, DKIM, and DMARC status was checked. |
| ☐ | cPanel login was tested; disk, email, and database limits are correct. |
| ☐ | The information to send to the customer is ready. |
Next Step
Your first customer's account is ready. Now point the domain to the hosting; if you want to automate sales, complete the WHMCS or WiseCP integration. Related guides: How to Set Up Private Nameservers, How to Change Nameservers, Setting up reseller hosting with WHMCS, and Setting up reseller hosting with WiseCP.
Frequently Asked Questions
How do I create a new cPanel account in WHM?
In WHM > Account Functions > Create a New Account, enter the customer's domain, username, password, and contact email, choose a hosting package, check the DNS and Mail Routing settings, and click Create. Then check the account with Go to cPanel and set up the domain's DNS.
Can I create a cPanel account without a hosting package?
It depends on your account's permissions. If your hosting provider hasn't given your reseller account permission to modify accounts, you must choose an existing package when creating one. Either way, creating packages first and assigning accounts to them makes management easier.
Why can't I see Create a New Account?
According to cPanel, hosting providers can enable or disable this screen for reseller accounts. If it doesn't appear in your menu or in Search Tools, contact our support team so they can check your account's permissions.
Can I create a cPanel account if the domain is registered with another company?
Yes. Where the domain is registered doesn't stop you from creating the account in WHM. For the site and email to reach the account, update the domain's nameservers or DNS records with the company where it's registered or with the DNS provider it uses.
Does the domain point to the hosting automatically when I create the account?
Not always. Creating the account prepares the hosting environment; the domain's nameserver or DNS settings must also be set up correctly to send visitors to it. If the domain points to other nameservers, the site won't load from the new account.
What address should I enter in the Email field?
Enter a contact address your customer can reach right now. This field is the cPanel account's contact email and doesn't create a mailbox on the customer's domain. Since email on the new domain may not be working yet, an address on another domain is the safer choice.
Can I change the username later?
Changing a username depends on your account's permissions and can affect settings tied to it, such as database names. For a smooth start, choose a lasting username when you create the account; if you need to change it, check with our support team.
Which hosting package should I choose?
Choose the package that matches what the customer bought. If they bought BUSINESS, choose BUSINESS; the wrong package creates the account with different limits. You can preview a package's settings with the magnifying glass icon before choosing.
Which Mail Routing option should I choose?
In most cases, use cPanel's recommended Automatically Detect Configuration. If email runs entirely on an external service such as Google Workspace or Microsoft 365 and the MX records point there, you may need Remote Mail Exchanger.
What is a temporary domain?
A temporary domain is a cpanel.site address that cPanel creates when you open an account without a real domain. It's useful for design and testing, but email doesn't work on these accounts, DNS can't be edited, and the address isn't ranked by search engines.
The account was created, so why won't the site load?
The most common reason is that the domain's DNS doesn't point to the new account yet. If you see a default cPanel page, the account is working and waiting for content. DNS changes can appear at different times on different networks because of caching.
How do I log in to my customer's cPanel?
You can use the Go to cPanel button on WHM's account creation confirmation. Your customer logs in with their own username and password at https://<server-address>:2083.
Can I create two cPanel accounts for the same domain?
No. A domain can only exist in one account on the server. If you try to create a second account with the same domain, you'll get an error saying the domain already exists. You also can't create a separate account for the www version.
I can't create a new account. Could I be at my limit?
Yes. According to cPanel, a reseller over their account creation limit can't create new accounts. The limit can be based on the number of accounts or total resource usage. You can delete unused test accounts or talk to our support team about upgrading your plan.
Already using Domain Name API Reseller Hosting and stuck?
If you can't see Create a New Account or get an error while creating an account, open a support ticket. Including your reseller username and the full text of the error message helps us resolve it faster.
Open a Support TicketLooking for white-label reseller hosting?
Open hosting accounts for your customers with cPanel/WHM and offer the service under your own brand.
Explore Reseller Hosting