How to Migrate a Website to Plesk Reseller Hosting
Moving a website to Plesk Reseller Hosting is more than copying web files. You also need to bring over databases, mailboxes and existing messages, DNS records, PHP settings and scheduled tasks, and check the SSL status. The safest approach is to prepare the new Plesk environment first, test the site there, and change DNS only after everything checks out.
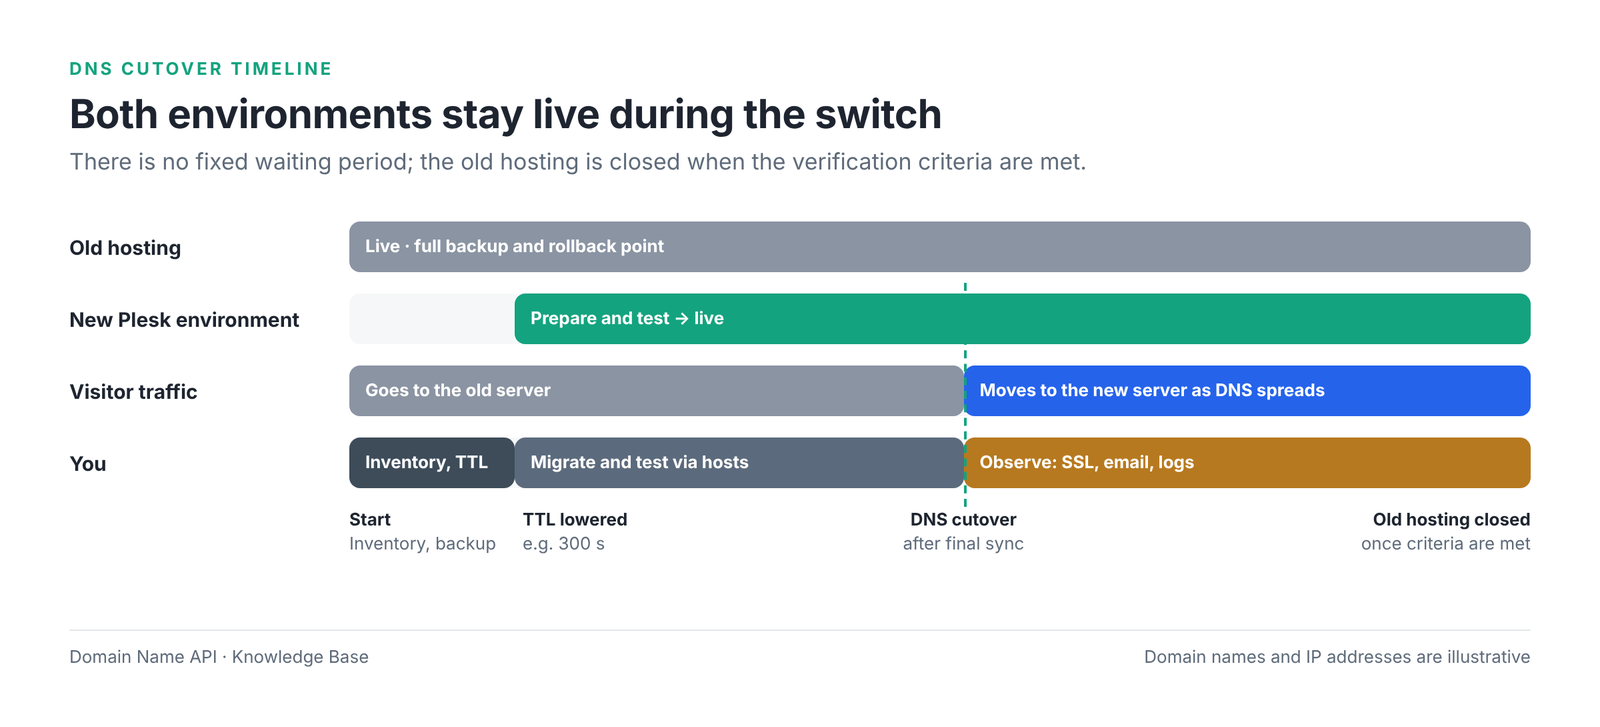
Don't cancel the old hosting as soon as the copy finishes. DNS changes don't reach everyone at the same moment. Until the new environment is verified, the old account is your way back.
Quick answer
To migrate a website to Plesk safely: take an inventory of the source and back it up. In Plesk, create a Customer and a Subscription on a Service Plan that fits the site. Move files, databases, email, PHP settings and scheduled tasks into that Subscription. Test the site without changing DNS, then point DNS to the new server and verify SSL and email. Close the old hosting last.
Important: Plesk Migrator is a server-level tool and is not visible on most reseller accounts. If you can't see it, use the manual method in this guide or ask the support team for a server-side transfer.
Who this guide is for: resellers on Domain Name API Plesk Reseller Hosting who are moving a customer's website from another host or another control panel. Hands-on time: 30–90 minutes for a small site. DNS propagation: can take a few more hours. Last updated: 4 October 2026
This guide uses example.com as the site, 192.0.2.10 as the new server and 198.51.100.20 as the old host. These are reserved documentation values; use the details from your own service information. Plesk menu names may appear in your interface language.
First, understand how Plesk is organized
In Plesk, a website doesn't move into an "account". It moves into a Subscription. Keeping four concepts apart before you start prevents most permission and limit problems later.
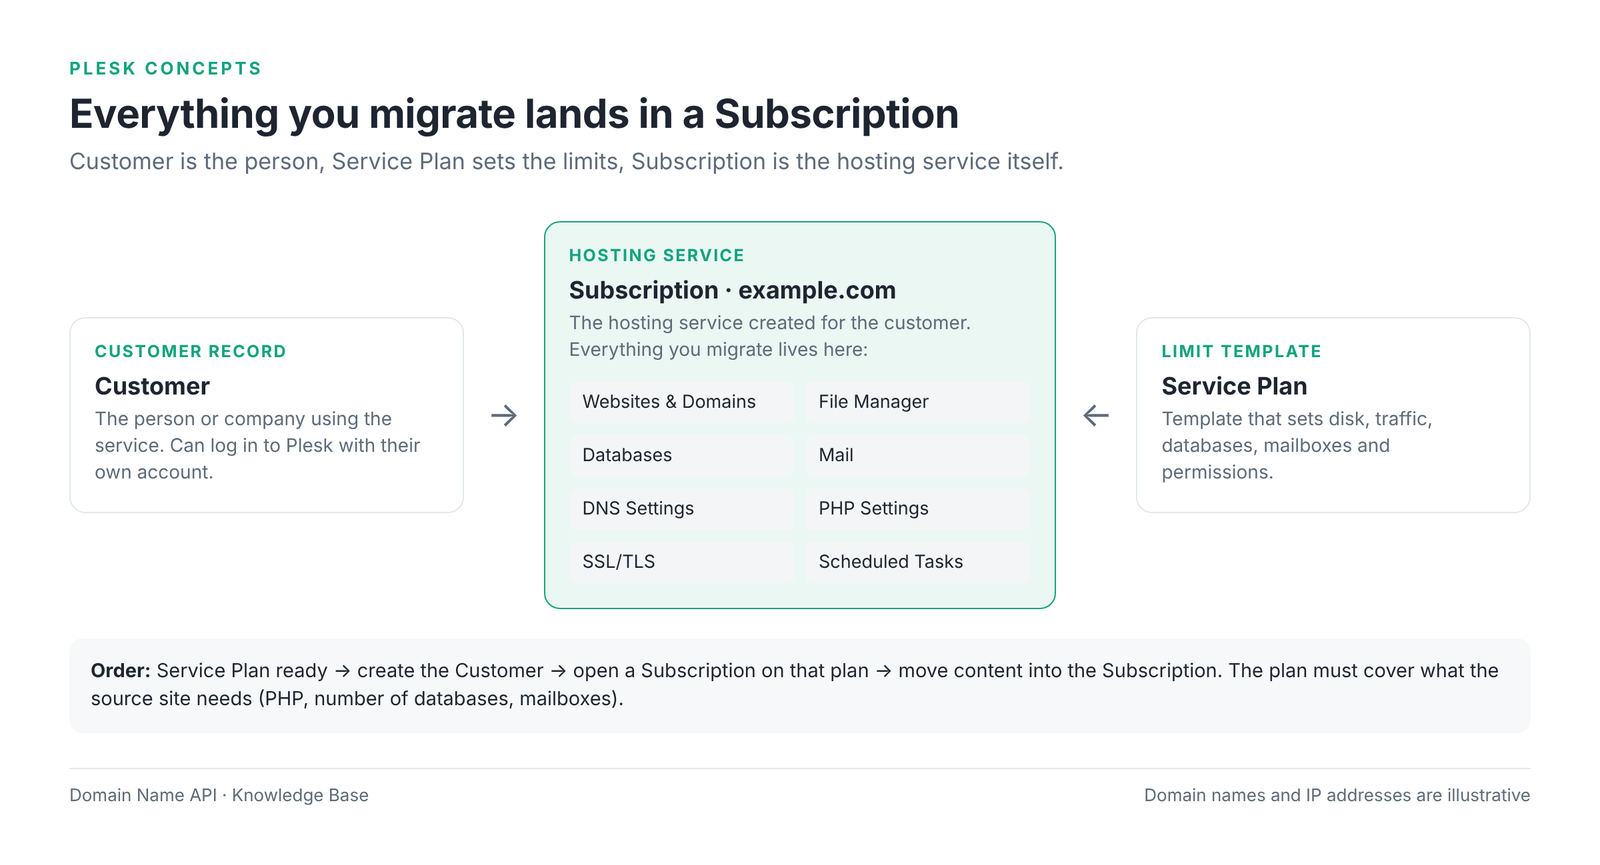
| Concept | What it is | Its role in the migration |
|---|---|---|
| Customer | The record of the person or company using the service | Owns the Subscription and can log in to Plesk with their own account. |
| Service Plan | Template for disk, traffic, number of databases and mailboxes, and permissions | Must cover what the source site needs, or imports stop at the limit. |
| Subscription | The hosting service opened for one domain | Every file, database, mailbox and setting you migrate lives here. |
| Websites & Domains | Sites, extra domains and subdomains inside the Subscription | Document root, PHP, SSL and scheduled tasks are managed per site here. |
Coming from cPanel?
A Service Plan is roughly like a cPanel package and a Subscription roughly like a cPanel account, but they are not the same thing. In Plesk, one Customer can own several Subscriptions, and features such as changing PHP settings or managing DNS must be allowed in the Service Plan.
The short path: migrate to Plesk in 12 steps
Every migration guide at Domain Name API follows the same safety standard. The commands are Plesk-specific, but the order never changes: DNS is always the last thing you touch.
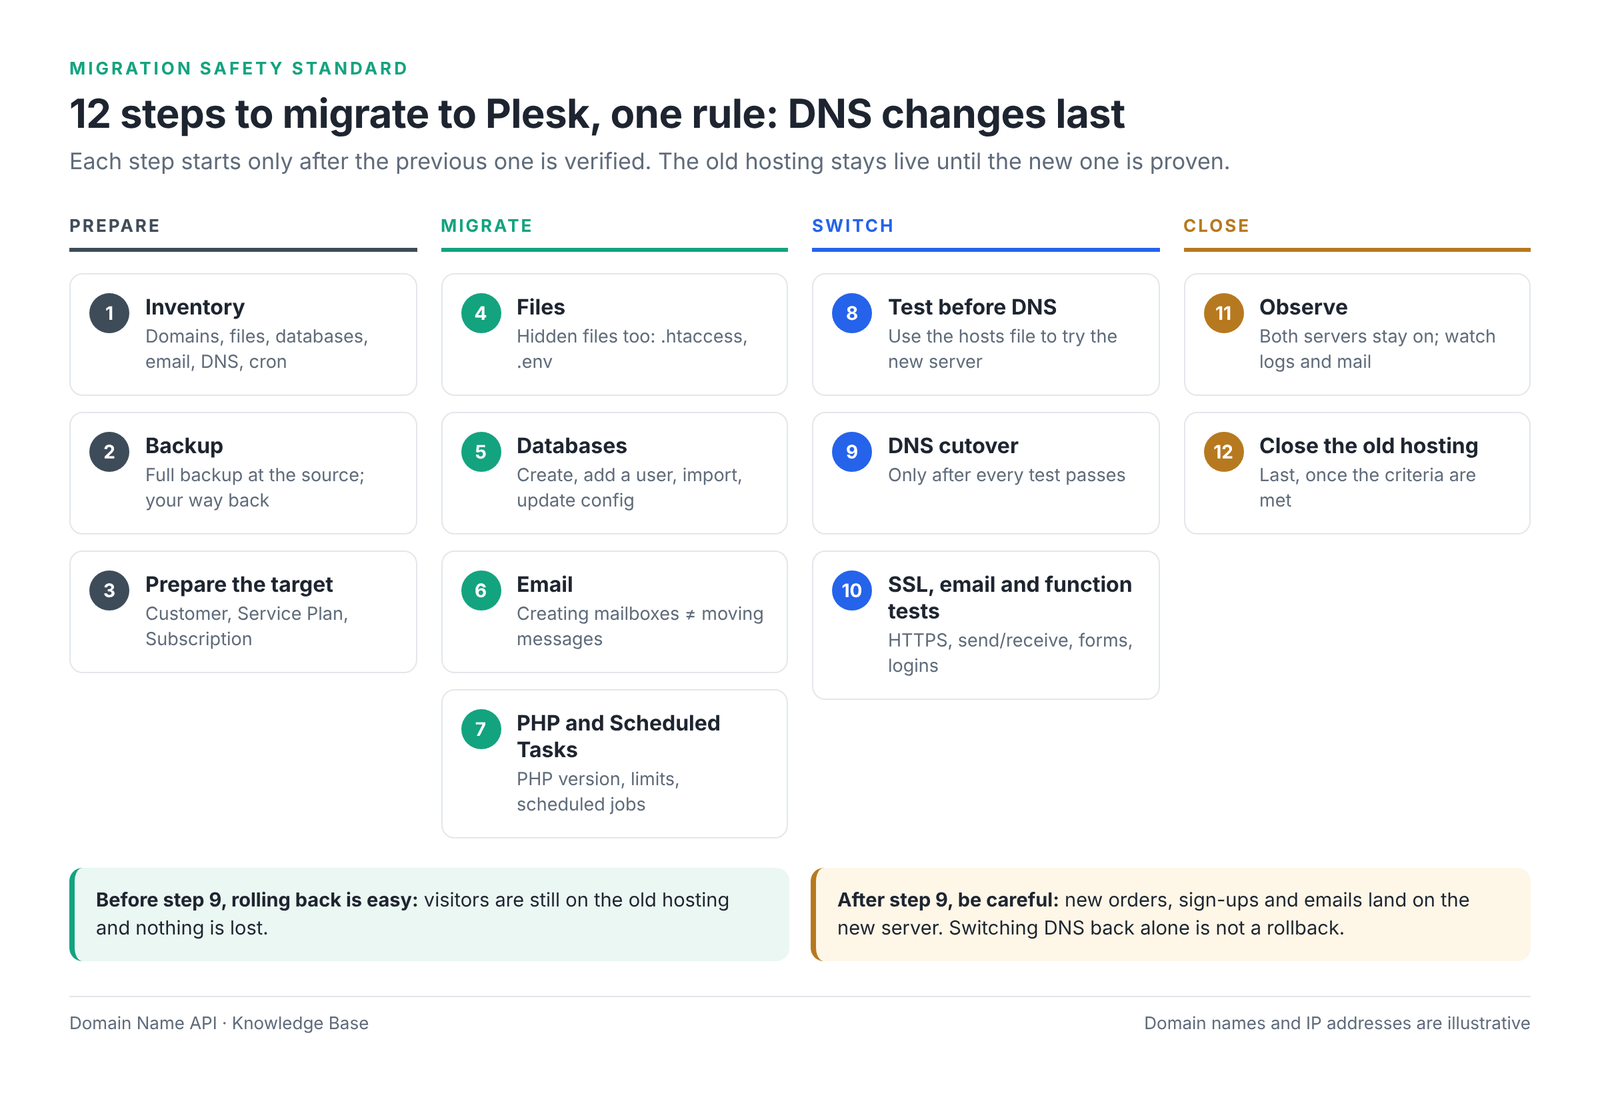
| Step | What you'll do | Where |
|---|---|---|
| 1 | Take an inventory, save the DNS records, lower the TTL | Old host and DNS provider |
| 2 | Back up and download the backup | Old control panel |
| 3 | Prepare the Service Plan, Customer and Subscription | Plesk › Service Plans, Customers |
| 4 | Move the website files | Websites & Domains › Files, or FTP |
| 5 | Create and import the databases | Websites & Domains › Databases |
| 6 | Create the mailboxes and move messages if needed | |
| 7 | Set PHP and recreate scheduled tasks | PHP Settings, Scheduled Tasks |
| 8 | Test the site without changing DNS | Your computer's hosts file |
| 9 | Point DNS to the new server | Domain management or DNS provider |
| 10 | Verify SSL, email and site functions | SSL/TLS Certificates, Mail |
| 11 | Keep both environments live while you observe | Logs, email, customer feedback |
| 12 | Close the old hosting once the criteria are met | Old hosting provider |
Which migration method should I use?
The right method depends on the source panel and on what your account is allowed to do. Don't assume that a feature in the official Plesk documentation is available on your reseller account: Plesk Migrator, server-to-server transfers and server settings can require administrator access.
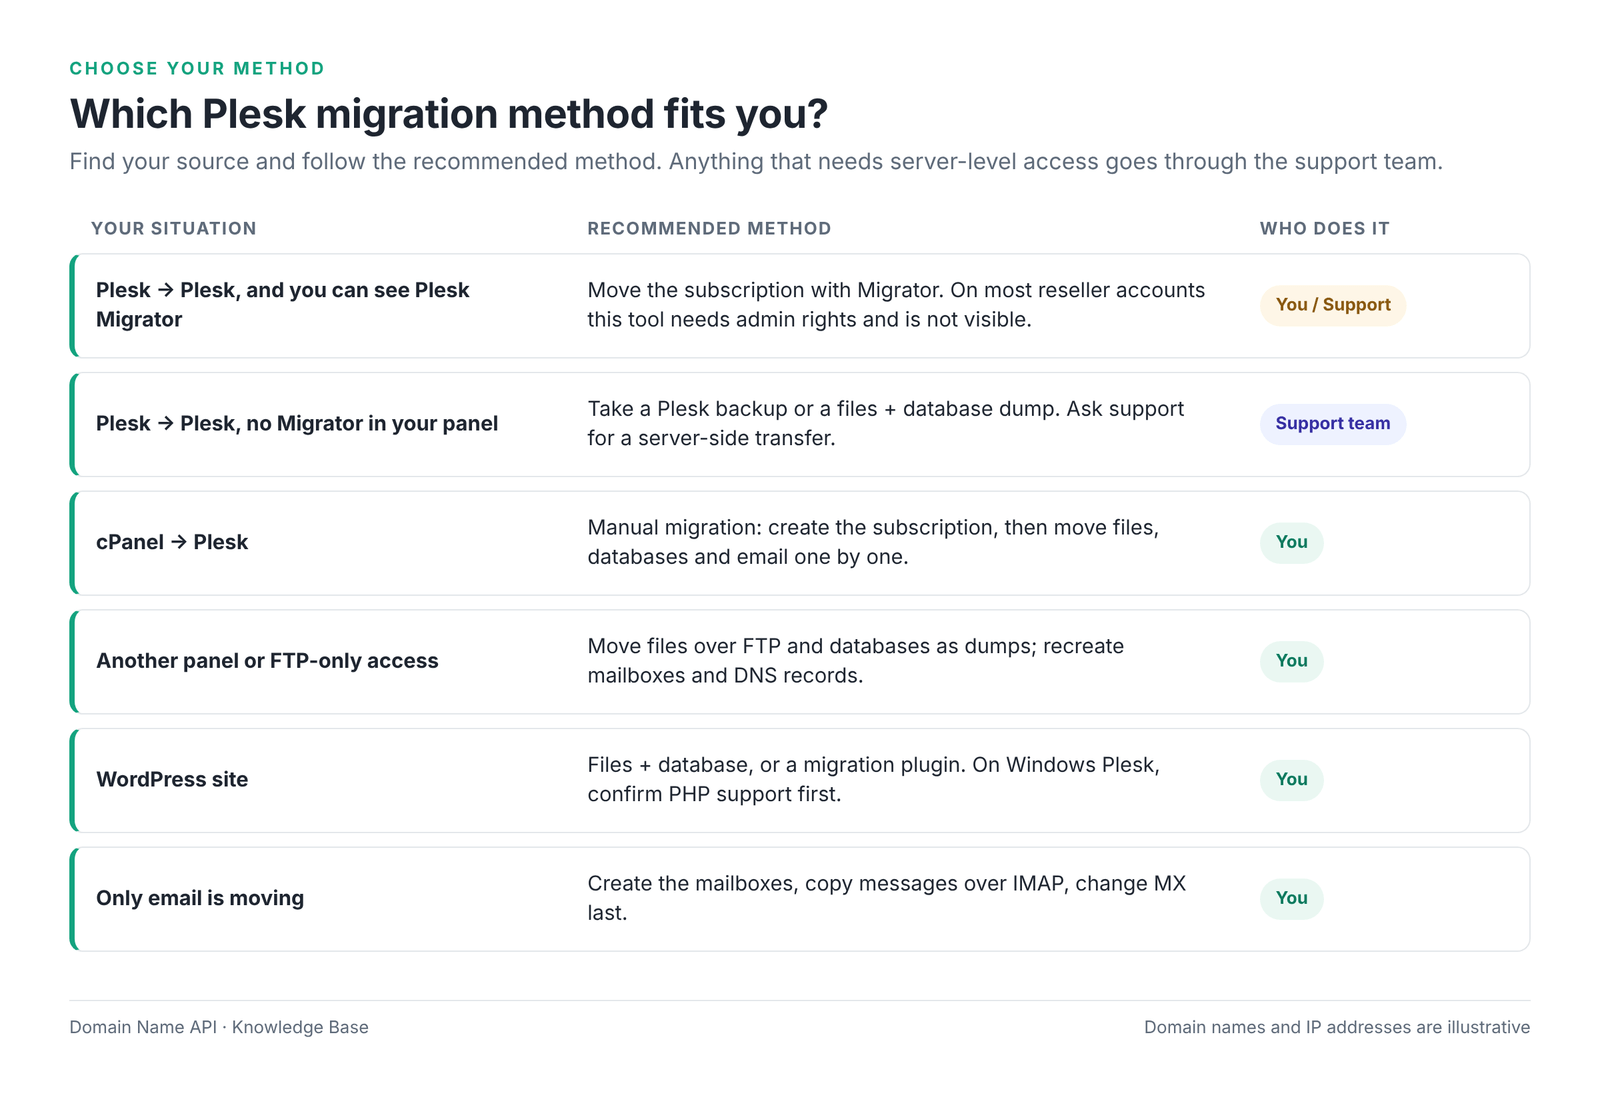
| Your situation | Recommended method |
|---|---|
| Plesk → Plesk and Plesk Migrator (Migration & Transfer Manager) is visible in your panel | You can move the subscription with Migrator. Afterwards, still follow steps 8–12 of this guide. |
| Plesk → Plesk, but Migrator isn't visible | That's normal. Use the manual method, or open a ticket for a server-side transfer. You can attach a backup from the source Plesk. |
| cPanel → Plesk | Manual migration: create the Subscription, then move files, databases, email and cron jobs (Scheduled Tasks in Plesk) one by one. |
| Another panel, or FTP and database access only | Move files over FTP and databases as dumps; recreate mailboxes and DNS records by hand. |
| WordPress | Files + database, or a migration plugin. On Windows Plesk, confirm PHP support first. |
| Only email is moving | Create the mailboxes, copy messages over IMAP and change MX last. |
About migration help
If you'd like us to do the migration for you, open a ticket with the source panel, number of accounts and approximate data size. We'll confirm scope, timing and any expected downtime after reviewing your request.
Step 1: Take an inventory before you start
The things that go missing in a Plesk migration are usually extra domains, email forwarding rules and jobs that run on the server at night. Write down the following at the source.
| Item | Why it matters |
|---|---|
| Main domain, extra domains, subdomains | In Plesk each one is a separate site with its own document root. |
| Website files and document roots | Plesk's default document root is httpdocs, not public_html. |
| Databases and users (MySQL/MariaDB, MS SQL if used) | The database engine must be supported on the target Plesk. |
| Mailboxes, quotas, aliases, forwarding | Creating a mailbox in Plesk doesn't move messages. |
| Whether existing messages must be moved | Agree this with your customer before you start. |
| DNS records: A, AAAA, CNAME, MX, TXT (SPF, DKIM, DMARC, verification) | If they get lost, email delivery and connected services break. |
| Where email is hosted | If the customer uses Microsoft 365 or Google Workspace, MX must not change. |
| PHP version, extensions and limits | A version mismatch is the most common cause of 500 errors. |
| Cron / scheduled jobs | They don't move to Plesk automatically; you'll recreate them as Scheduled Tasks. |
Redirects, .htaccess or web.config | They behave differently on Linux and Windows Plesk. |
| SSL status | Certificates don't follow the site to the new Subscription. |
| FTP users and external integrations | Services that allow-list IP addresses need the new server IP. |
Save your DNS records and lower the TTL
- Export all current DNS records or take a screenshot of them.
- Lower the TTL of the A and MX records to something short, such as 300 seconds, ideally at least a day before the switch.
Step check
What you should see: A list of everything you'll move and a copy of the old DNS records.
Most common mistake here: Listing only the web folder and forgetting extra domains and scheduled jobs.
Next step: Back up the source.
Step 2: Back up the source hosting
- If the source is Plesk: create a full backup in the subscription's Backup Manager and download it. Protecting the backup with a password may be required to restore it on another server.
- If the source is cPanel: download the full backup from Backup, plus partial backups of the home directory and each database. Plesk doesn't restore cPanel backups directly; you'll use these files for a manual migration.
- If the source is another panel or FTP-only: download all website files as one archive and each database as a
.sqldump.
Passwords can't be read from a backup
In a manual migration you'll set new mailbox and database passwords. Plan how you'll share the new mailbox passwords with your customer before you start.
Step check
What you should see: A file archive and a dump of every database on your own computer.
Most common mistake here: Leaving the only backup on the server you're about to close.
Next step: Prepare the target in Plesk.
Step 3: Prepare the Service Plan, Customer and Subscription
Create the Subscription the site will live in before you move any content. The order is: plan, then customer, then subscription.
- Log in to Plesk with your reseller account (HTTPS on port 8443, or single sign-on from the reseller panel).
- Create a plan in Service Plans › Add a Plan, or choose an existing one. Disk space, databases, mailboxes and extra domains must be at least what the source uses.
- In the plan's Permissions, check what the customer will need: DNS management, changing PHP settings, managing Scheduled Tasks. If a permission is off, the related menu won't appear in the Subscription.
- Create the customer in Customers › Add a Customer. On the same screen you can tick Create a subscription for the customer and enter the domain (
example.com) and plan. - If the customer already exists, open the new subscription in Subscriptions › Add Subscription and choose that customer as the owner.
Related guides: How to Create a Service Plan in Plesk · How to Create Your First Customer and Subscription in Plesk
Step check
What you should see: The example.com subscription in the Subscriptions list, with the right customer and plan.
Most common mistake here: Choosing a plan smaller than the source site. When the database or mailbox limit is reached, the import stops halfway.
Next step: Move the files.
Step 4: Move the website files
In Plesk, a site's files sit in the Subscription's document root. The default document root is httpdocs; for extra domains it is set when the site is created and shown under Hosting Settings.
With File Manager
- Open Websites & Domains › Files (File Manager) and go into the document root.
- Upload a
.ziparchive of the source files. - Select the archive and use Extract Files. Make sure the files land directly in the document root, not in an extra subfolder.
- If Plesk's default
index.htmlclashes with your site's own index file, delete it.
With FTP
FTP or SFTP is more reliable for large sites. Connection details are under Websites & Domains › FTP Access (or Connection Info). Because DNS hasn't changed yet, connect to the server address from your service details, not to the domain name.
Hidden files and paths
Make sure .htaccess, .env and application config files came across.
Update absolute paths in config files. A path like /home/user/public_html from the source is different in Plesk; take the correct path from File Manager or Hosting Settings.
Linux Plesk
Sites run on Apache and nginx. .htaccess rules are processed by Apache.
Plesk manages file ownership and permissions; files uploaded through File Manager get the right owner.
Windows Plesk
Sites run on IIS. IIS ignores .htaccess; redirects and URL rules live in web.config.
If the source is a PHP site on Linux, you'll need to translate .htaccess rules into web.config. That doesn't always go smoothly, so PHP sites are better placed on Linux Plesk.
Step check
What you should see: The site's files and hidden files in the document root.
Most common mistake here: Extracting the archive into a subfolder such as httpdocs/site/.
Next step: Move the databases.
Step 5: Move the databases
A database migration has six parts, in this order: export, create the database, create a user, import, update the application config, and test.
- Export the database at the source as a
.sqldump (or a compressed.zip/.gz). - In Plesk, create it in Websites & Domains › Databases › Add Database. Choose the database server (for example MySQL/MariaDB) and set up a database user on the same screen.
- Use Import Dump next to the database to upload the dump.
- Take the host name from the database's Connection Info. Don't assume
localhost; use the value Plesk shows. - Update the application config (
wp-config.phpfor WordPress,.envfor Laravel) with the new database name, user, password and host.
Linux Plesk
MySQL/MariaDB dumps are imported with Import Dump. phpMyAdmin can also be opened from the database card.
Windows Plesk
Windows reseller packages include MS SQL. When adding an MSSQL database, choose MS SQL as the database server.
Which MSSQL import formats work (a .bak backup or a script) depends on the server setup. If Import Dump won't accept your file, contact support. MySQL and MSSQL dumps can't be imported into each other without conversion.
Large databases
There's an upload size limit. Compress the dump; if it still doesn't fit, ask support for help. A half-finished import leaves missing tables, and the errors often show up later.
Step check
What you should see: The same number of tables as the source, and Connection Info values in the config file.
Most common mistake here: Leaving localhost in the config without checking the host Plesk shows.
Next step: Move email.
Step 6: Create mailboxes and move messages
Creating a mailbox in Plesk doesn't mean the messages on the old server have moved. Before you change DNS, decide whether existing messages need to be migrated separately.
- In Mail, use Create Email Address for each address and set the quota to match the source.
- Recreate aliases and forwarding in each address's settings.
- Move existing messages. If your Plesk version shows an import option for the mailbox (Import Mail), use it with the old server's IMAP details. If it doesn't, add the old and new mailbox to an email client and drag the folders across, or use an IMAP sync tool.
- After the MX change, run the copy once more for messages that reached the old server late.
If email is hosted elsewhere, don't point MX to Plesk by mistake
If the customer uses Microsoft 365 or Google Workspace, don't create mailboxes in Plesk.
Turn off the mail service for this domain in Plesk (Mail › Mail Settings, the mail service option for the domain). If it stays on, contact-form notifications from the site may be delivered to Plesk's local mail system instead of the external service.
In DNS Settings, keep MX, SPF, DKIM and verification records exactly as they were.
Step check
What you should see: A mailbox for every address and, where needed, the migrated folders.
Most common mistake here: Creating mailboxes and assuming the messages will follow.
Next step: Set PHP and Scheduled Tasks.
Step 7: Set PHP and recreate Scheduled Tasks
PHP settings
- In Websites & Domains, open the site's PHP (PHP Settings).
- Set the PHP version to match the source, or to a version the application supports. If a handler option is shown, leave the default unless you have a specific requirement.
- Set
memory_limit,max_execution_time,upload_max_filesizeandpost_max_sizeto what the source needs. Values can't exceed the Service Plan's limits. - If PHP Settings isn't visible, the permission is off in the Service Plan; check the plan's Permissions.
Windows Plesk
If you're moving an ASP.NET or .NET application, check the site's ASP.NET settings and application pool options. These only appear if your package and Service Plan support them; otherwise contact support.
Scheduled Tasks
Cron jobs from the source don't move to Plesk automatically. Recreate each one in Websites & Domains › Scheduled Tasks › Add Task. Plesk can run a command, fetch a URL or run a PHP script. Update file paths in the command to the new location in Plesk.
Don't let the same task run twice
If a task runs on both the old and new server, customers can get duplicate emails or the same action can run twice. Create the new tasks disabled, enable them at the DNS switch, and stop the old ones at the same time.
Step check
What you should see: A compatible PHP version and Scheduled Tasks with updated paths (still disabled).
Most common mistake here: Testing the site before checking the PHP version.
Next step: Test without changing DNS.
Step 8: Test the site without changing DNS
The most reliable way to see the site on the new server before changing DNS is to add one line to your own computer's hosts file. If your panel offers Website Preview, it's fine for a quick first look, but sites that store absolute URLs in the database (like WordPress) may not behave correctly there. Do the real test with the hosts file.
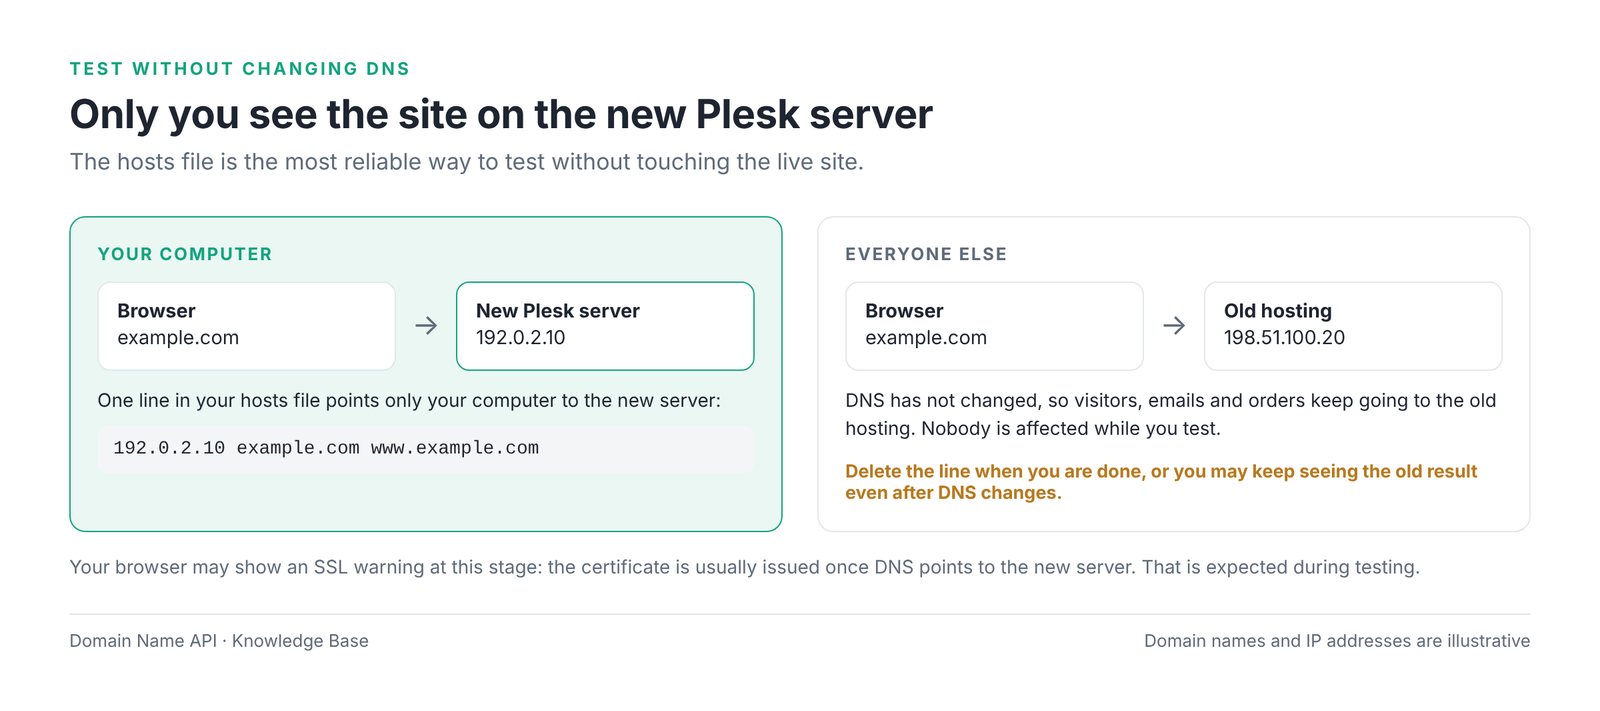
| Operating system | File | How to open it |
|---|---|---|
| Windows | C:\Windows\System32\drivers\etc\hosts | Open Notepad with Run as administrator, then open the file. |
| macOS / Linux | /etc/hosts | In Terminal: sudo nano /etc/hosts |
# Test the new Plesk server (delete after testing)
192.0.2.10   example.com   www.example.com
Save, clear the DNS cache (ipconfig /flushdns on Windows) and open the site in a private window.
What to test
- Home page and inner pages
- Login and admin area
- Database reads and writes (sign-up, comment, draft)
- Forms and file uploads
- Images, CSS and JavaScript
- Payment, cart and external APIs (in test mode)
- Application functions that don't depend on email
- Extra domains and subdomains
An SSL warning is normal here
The certificate is usually issued after the domain points to the new server. You can click through the browser warning while testing, but don't enter real payment details.
Step check
What you should see: The site and its admin area working on the new server without errors.
Most common mistake here: Changing DNS before testing, or forgetting to remove the hosts line afterwards.
Next step: If the site is dynamic, plan the final sync, then change DNS.
Avoid data loss on dynamic sites
On e-commerce, membership, booking, forum or CRM sites, new data keeps landing on the old server between your first copy and the DNS switch. If you don't bring it across, it won't exist on the new site.
- Pick a maintenance window with low traffic and let your customer know.
- When it starts, turn on maintenance mode or stop writes on the old site.
- Take a final database dump and re-import it into Plesk; copy any files uploaded in the meantime (final sync).
- Change DNS, enable the Scheduled Tasks and turn off maintenance mode.
This shortens downtime but doesn't remove it. Promise your customer a short, planned maintenance window rather than zero downtime.
Step 9: Point DNS to the new server
You don't need to transfer the domain; you only change where it points. Changing nameservers isn't required for every migration either.
| Scenario | What changes | When to choose it |
|---|---|---|
| A. Switch to private nameservers | The domain's nameservers become ns1.example.net and ns2.example.net. DNS records are then managed in Plesk's DNS Settings. | When you'll manage the customer's DNS and DNS service is enabled in the plan. |
| B. Update records only | At the current DNS provider, set the A record to 192.0.2.10 and update www and AAAA records if needed. | When DNS is hosted elsewhere and will stay there. |
Related guide: How to Create Private Nameservers on Plesk Reseller Hosting
In scenario A, add your records to the new zone first
When the Subscription is created, Plesk builds default records from the server's DNS template. Custom records from the old DNS are not included.
Before changing nameservers, recreate MX, SPF, DKIM, DMARC and verification TXT records in DNS Settings with their old values. If email is hosted elsewhere, correct the default mail and MX records for that service.
Step check
What you should see: The new IP for nslookup example.com; in scenario A, the new nameservers for nslookup -type=NS example.com.
Most common mistake here: Changing nameservers before adding custom records to the new zone.
Next step: Verify SSL, email and site functions.
Step 10: Verify SSL, email and site functions
SSL and HTTPS
- Once DNS points to the new server, open Websites & Domains › SSL/TLS Certificates.
- If Let's Encrypt is available in your panel, issue a certificate for the domain and
www. The old certificate doesn't move on its own; if you have a paid certificate, upload the certificate and private key on this screen. - In Hosting Settings, turn on the permanent (301) redirect from HTTP to HTTPS. If the application,
.htaccessorweb.configalso redirects, keep only one, or you may get a redirect loop. - Check the padlock, the site with and without
www, and any mixed-content warnings.
- Send a test message and receive one from an outside address.
- Confirm SPF and DKIM records exist in DNS. DKIM signing is in the domain's mail settings in Plesk; if DNS is hosted elsewhere, add the record there.
- Check that the DMARC record still has its old value.
Post-migration checklist
"The site loads" is not the same as "the migration worked":
- The domain points to the new server
- HTTPS with a valid certificate (
wwwincluded) - Home page and inner pages
- Login and admin area
- Database reads and writes
- Forms and uploads
- Static files (images, CSS, JS)
- Redirects
- Scheduled Tasks (running on new, stopped on old)
- Sending and receiving email
- MX, SPF, DKIM, DMARC
- Extra domains and subdomains
- External integrations
- Logs (Websites & Domains › Logs)
Step 11: Keep both environments live while you observe
Instead of a fixed number of days, look for these signs:
- No meaningful traffic is left on the old server.
- No new email is arriving on the old server, and anything that did has been copied.
- The checklist is complete and your customer has confirmed the site works.
- On business-critical sites, one full business cycle (an order, an invoice, a newsletter) has completed on the new server.
Step 12: Close the old hosting last
- Take one last backup of the old hosting and keep it.
- Confirm scheduled jobs on the old server have stopped.
- Cancel the old hosting. If the domain is registered with the same company, make sure you cancel only the hosting, not the domain.
Rollback plan
Before you start, the old hosting should be live, a backup in your hands, the old DNS records saved and the rollback steps written down. Rolling back before the DNS switch is easy. On sites that write to a database, switching DNS back isn't enough on its own: orders, sign-ups and emails that reached the new server have to be moved back too.
Troubleshooting
| Problem | Likely cause | Fix |
|---|---|---|
| 403 Forbidden | No index file in the document root, or a permission/rule blocks access | Check the files are in the document root and the index file exists; temporarily disable the .htaccess or web.config rule. |
| 500 Internal Server Error | PHP version or extension mismatch, faulty rule | Match the PHP version to the source; read the error line in Logs. |
| Plesk default page appears | Files in the wrong folder, or the default index.html wasn't removed | Confirm the document root in Hosting Settings and remove the default file. |
| Database connection error | Wrong name, user, password or host in the config file | Compare with the database's Connection Info. |
| Import Dump fails | File too large, unsupported format or different character set | Compress the dump and check the database type; if it persists, contact support. |
| Missing PHP extension | The extension isn't enabled for the selected PHP version | Try another PHP version or ask support about the extension. |
| PHP Settings menu is missing | Permission is off in the Service Plan | Enable PHP settings under the plan's Permissions. |
| Subscription suspended | The subscription or customer is suspended, or a limit was exceeded | Check status under Customers and Subscriptions; reactivate or upgrade the plan. |
| Resource limit warning | Disk, database or mailbox limit reached | Upgrade the Service Plan or move the subscription to a bigger plan. |
| Redirect loop | HTTPS redirect is defined in more than one place | Keep the redirect only in Hosting Settings or only in the application. |
| SSL can't be issued | DNS doesn't point to the new server yet, or a CAA record blocks it | Confirm the IP with nslookup, check CAA, then retry. |
| Site still loads from the old server | DNS hasn't propagated or the hosts line is still there | Remove the hosts line, flush DNS cache, wait for the TTL. |
| Email isn't arriving | MX points to the old server, or mail service is off | Check MX in DNS Settings and the mail service in Mail Settings. |
| Form emails don't reach the external service | Local mail service is on for the domain in Plesk | If mail is on Microsoft 365/Google, turn off mail service for the domain. |
| Scheduled Task doesn't run | Old file path, or the task was left disabled | Update the path, enable the task and try Run Now. |
| Redirect rules don't work on Windows | IIS ignores .htaccess | Move the rules to web.config. |
| ASP.NET application won't start | Wrong .NET version or application pool setting | Check ASP.NET settings; if the option isn't there, contact support. |
| Plesk Migrator isn't visible | The tool requires administrator rights | Use the manual method or open a ticket. |
Common mistakes
- Starting without a backup.
- Moving only the files and forgetting the database.
- Assuming that creating a mailbox moves the messages.
- Treating Plesk admin features (Migrator, server settings) as reseller features.
- Choosing a Service Plan smaller than the source, or leaving needed permissions off.
- Changing DNS before testing.
- Not checking the PHP version and extensions.
- Forgetting Scheduled Tasks, or running them on both servers.
- Losing MX, SPF, DKIM and verification records when changing nameservers.
- Skipping the final sync on dynamic sites.
- Closing the old hosting too early.
- Not checking SSL and the
wwwaddress. - Mixing up Linux and Windows Plesk behaviour (
.htaccessvsweb.config, MySQL vs MSSQL).
Frequently asked questions
How do I migrate a website to Plesk?
Take an inventory of the source and back it up. In Plesk, create a Subscription on a suitable Service Plan, upload the files to the document root, import the databases, create the mailboxes and move messages if needed. Set PHP and Scheduled Tasks, test the site with the hosts file, change DNS, then verify SSL and email.
How do I migrate from Plesk to Plesk?
If Plesk Migrator is visible in your panel, you can move the subscription with it. On most reseller accounts Migrator needs administrator rights and isn't visible. In that case, take a backup or a files and database dump from the source Plesk and migrate manually, or ask the support team for a server-side transfer.
Can I move a site from cPanel to Plesk?
Yes. Plesk doesn't restore cPanel backups directly, so the migration is manual. Download the files and database dumps from cPanel, create a Subscription in Plesk, upload the files to httpdocs, import the databases with Import Dump, create the mailboxes and recreate cron jobs as Scheduled Tasks.
What is Plesk Migrator?
Plesk Migrator is a server-level Plesk tool that transfers websites, databases and email from another server into Plesk. It connects to the source server and runs the transfer automatically. Installing and using it usually requires administrator access to the Plesk server.
Can a reseller use Plesk Migrator?
On most reseller accounts, no. Migrator is a server-level tool that needs administrator rights. If you don't see a Migration & Transfer Manager menu in your panel, that's expected. Use the manual method in this guide or open a ticket for a server-side transfer.
Do I need to transfer my domain to move hosting?
No. The domain can stay with its current registrar. To migrate, you only point the domain's nameservers, or the A record at your current DNS provider, to the new server. A domain transfer is a separate, optional process.
Do I have to change nameservers?
No. If DNS is hosted with another provider, updating the A record, plus www and AAAA records if needed, to the new IP is enough. If you do change nameservers, DNS is then managed in Plesk's DNS Settings, so add MX, SPF, DKIM and verification records there first.
Does email move to Plesk automatically?
Not in a manual migration. Creating a mailbox in Plesk doesn't bring old messages with it. Move them with Plesk's import option if your version has one, or with an email client or IMAP sync tool. Run the copy once more after the MX change for late messages.
How do I move a database to Plesk?
Export the database at the source as a dump. In Plesk, create the database and its user under Databases and upload the dump with Import Dump. Then put the host from Connection Info and the new user details into the application's config file, and test that the site can read and write data.
Can I test the site without changing DNS?
Yes. Add a line with the new server's IP and your domain to your computer's hosts file, and the site will load from the new server only for you. Website Preview, if available, is fine for a quick look, but for WordPress-style sites the hosts file gives the reliable result.
Will my SSL certificate move to Plesk automatically?
No. Once DNS points to the new server, issue a certificate for the domain and www in SSL/TLS Certificates, using Let's Encrypt if it's available in your panel. If you use a paid certificate, upload the certificate and private key on the same screen, then turn on the HTTPS redirect.
When should I close the old hosting?
There's no fixed date. Close it when the old server no longer gets meaningful traffic or new email, the checklist is complete and your customer has approved the site. Take a final backup first and make sure scheduled jobs on the old server have stopped.
How do I avoid losing data during the migration?
Back up and keep the old hosting live. For sites that write to a database all the time, plan a short maintenance window: stop writes, move the latest database to Plesk, then change DNS. That final sync stops orders and sign-ups made after the first copy from being lost.
Is migrating to Windows Plesk the same as Linux Plesk?
The main steps are the same, but the details differ. Windows Plesk runs on IIS, uses web.config instead of .htaccess and offers MS SQL. Linux Plesk runs Apache and nginx with MySQL/MariaDB. PHP sites suit Linux Plesk; ASP.NET and MSSQL applications suit Windows Plesk.
Related guides
- How to Create Private Nameservers on Plesk Reseller Hosting
- How to Create a Service Plan in Plesk
- How to Create Your First Customer and Subscription in Plesk
- How to Migrate a Website to cPanel Reseller Hosting
When you open a ticket, include the domain you're moving, the source panel, the target platform (Linux or Windows Plesk) and the step you're on.
Sell hosting under your own brand
Explore Plesk Reseller Hosting packages to sell hosting under your own brand.
Explore Plesk Reseller Hosting