How to Migrate a Website to cPanel Reseller Hosting
Moving a website to cPanel Reseller Hosting is more than copying web files. You also need to bring over databases, email accounts and existing messages, DNS records, PHP settings and cron jobs, and check the SSL status. The safest path is to prepare the new cPanel account first, test the site without changing DNS, and switch DNS only once the tests pass.
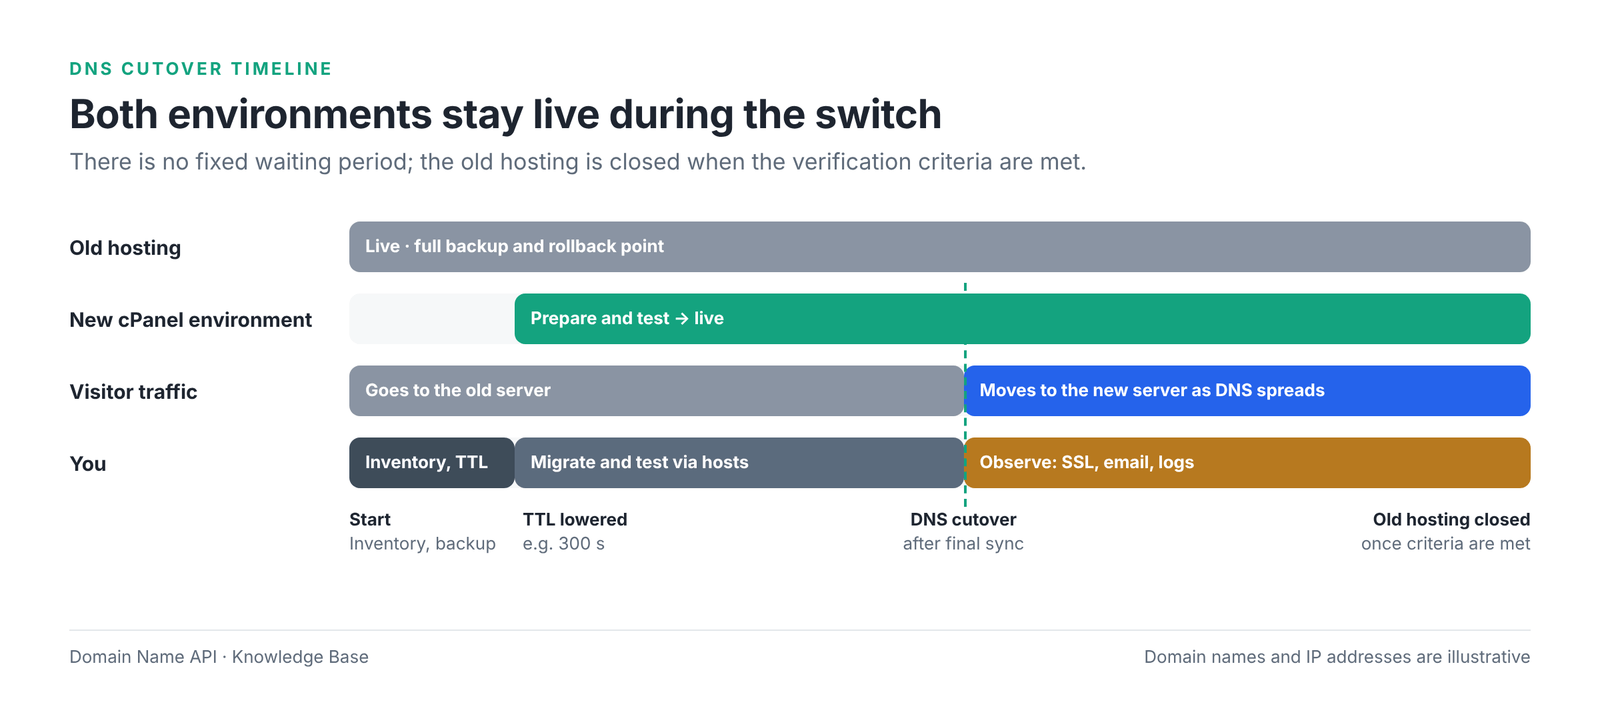
Don't cancel the old hosting as soon as the copy finishes. DNS changes don't reach everyone at once. Until everything is verified, the old account is your way back if a file was missed or an email arrives late.
Quick answer
To migrate a site to cPanel safely: take an inventory of the source and make a full backup. Create the package and cPanel account in WHM. Move files, databases, email and cron jobs. Test the site through your hosts file without changing DNS. When the tests pass, point DNS to the new server and verify SSL and email. Close the old hosting last.
Important: restoring a full backup (cpmove) and WHM's Transfer Tool need server-level (root) access, so on a reseller account they go through the support team. You can do a migration with partial backups yourself.
Who this guide is for: resellers on Domain Name API Linux cPanel Reseller Hosting who are moving a customer's site from another host. Hands-on time: 30–90 minutes for a small site. DNS propagation: can take a few more hours. Last updated: 4 October 2026
This guide uses example.com as the site, 192.0.2.10 as the new server and 198.51.100.20 as the old host. These are reserved documentation values; use the details from your own service information.
The short path: a safe cPanel migration in 12 steps
Every migration guide at Domain Name API follows the same safety standard. The order never changes: each step starts only after the previous one is verified, and DNS is always the last thing you touch.
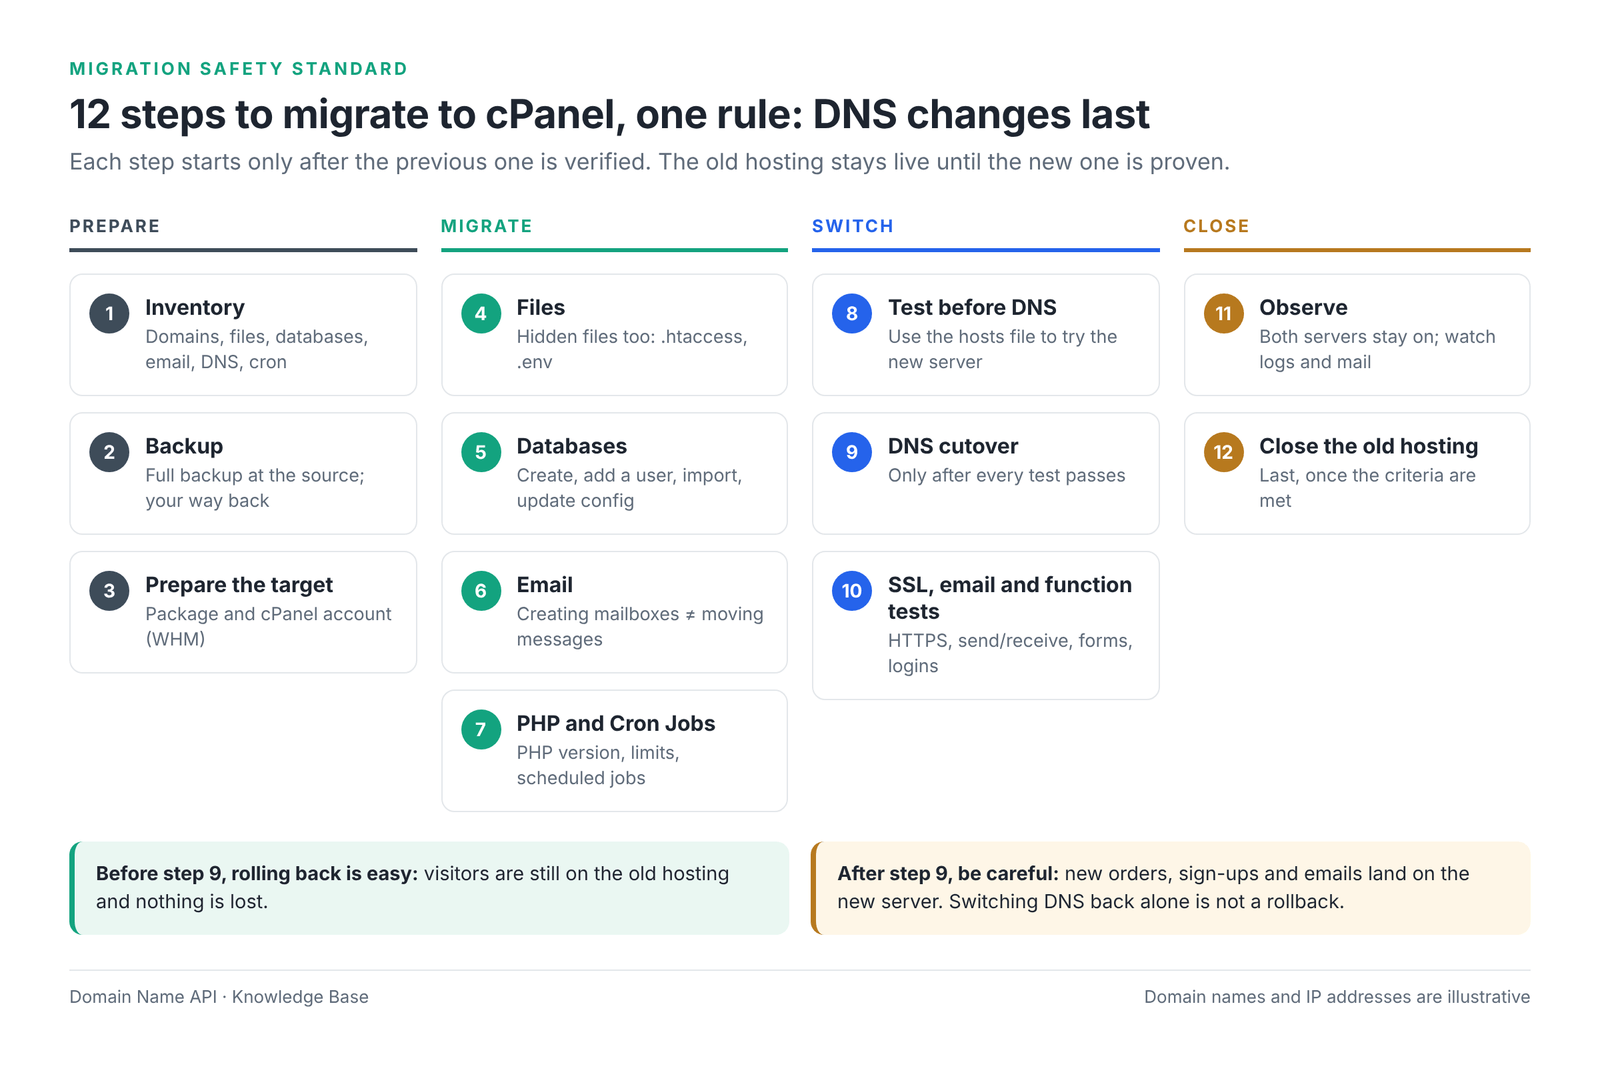
| Step | What you'll do | Where |
|---|---|---|
| 1 | Take an inventory, save the DNS records, lower the TTL | Old host and DNS provider |
| 2 | Make full and partial backups and download them | Old cPanel › Backup |
| 3 | Create the package and the new cPanel account | WHM › Packages, Create a New Account |
| 4 | Move the website files | New cPanel › Backup or File Manager |
| 5 | Move databases, add a user, update the config file | New cPanel › MySQL Databases, phpMyAdmin |
| 6 | Create email accounts and move messages if needed | New cPanel › Email Accounts |
| 7 | Set the PHP version, limits and Cron Jobs | New cPanel › MultiPHP, Cron Jobs |
| 8 | Test the site without changing DNS | Your computer's hosts file |
| 9 | Point DNS to the new server | Domain management or DNS provider |
| 10 | Verify SSL, email and site functions | New cPanel › SSL/TLS Status, Email Deliverability |
| 11 | Keep both environments live while you observe | Logs, email, customer feedback |
| 12 | Close the old hosting once the criteria are met | Old hosting provider |
Which migration method should I use?
The right method depends on what access you have at the source. Anything that needs server-level rights can't be done with a reseller account; for those steps you open a ticket.
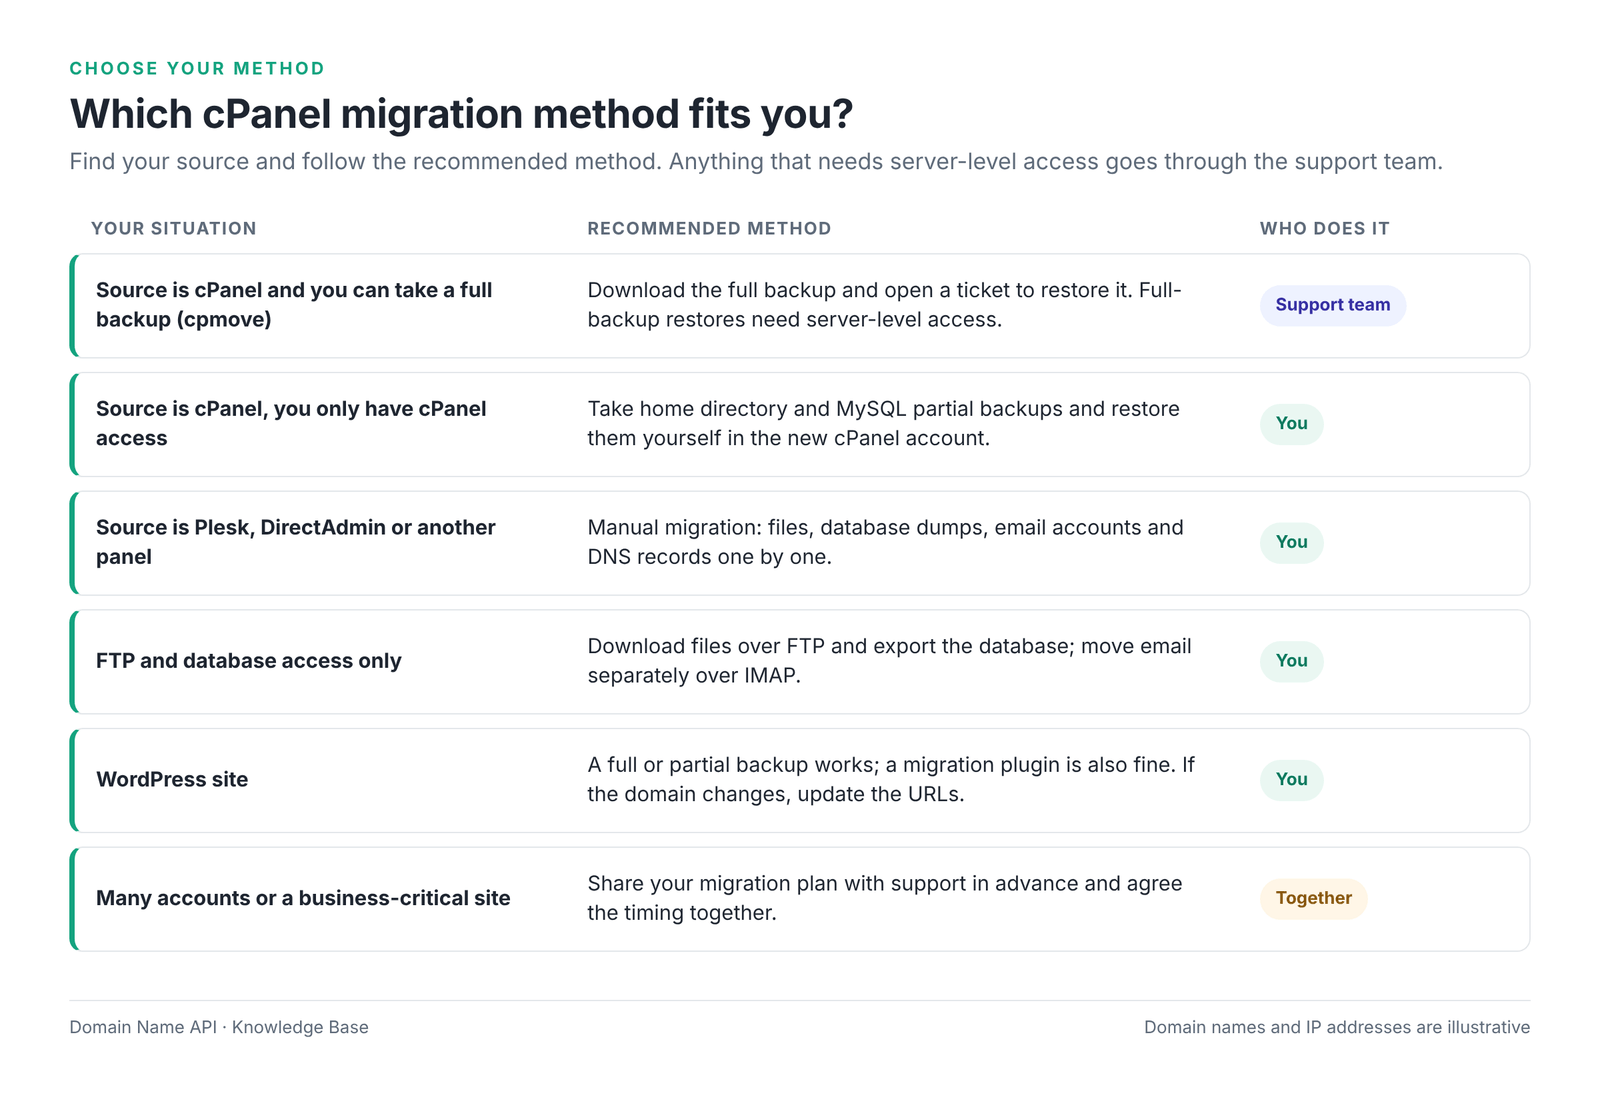
What a reseller account can't do
WHM's Transfer Tool and Restore a Full Backup/cpmove File belong to the server administrator and don't appear in reseller WHM. If you can't see them, that's expected.
If you want to migrate with a full backup, prepare the backup file and open a ticket. Confirm the scope and timing of migration help with the support team before you start.
Step 1: Take an inventory before you start
Most things lost in a migration go missing because nobody wrote them down: a subdomain, a TXT record added for an email service, or a cron job that runs at night. List the following at the source first.
| Item | Where to look at the source | Why it matters |
|---|---|---|
| Main domain, addon domains and subdomains | cPanel › Domains | Each has its own document root; forget one and that site won't load. |
| Website files and document roots | File Manager › public_html and other folders | Files in the wrong folder show a 404 or a default page. |
| Databases and their users | MySQL Databases | The site connects with a database name, user and password. |
| Email accounts and quotas | Email Accounts | If the accounts aren't recreated, incoming email bounces. |
| Forwarders, autoresponders, filters | Forwarders, Autoresponders, Email Filters | Invisible, but they break workflows. |
| DNS records (A, CNAME, MX, TXT) | Zone Editor or the current DNS provider | Lose SPF, DKIM, DMARC or verification records and email and services break. |
| Where email is hosted | The address in the MX record | If it's Microsoft 365 or Google Workspace, MX must not change. |
| PHP version and settings | MultiPHP Manager, MultiPHP INI Editor or Select PHP Version | A different PHP version can cause 500 errors. |
| Cron Jobs | Cron Jobs | Billing, backups and newsletters don't move by themselves. |
| SSL and redirects | SSL/TLS Status, Redirects, .htaccess | HTTPS and the www redirect must be checked again on the new server. |
| FTP accounts | FTP Accounts | Customer or developer access shouldn't be cut off. |
| External integrations | Payment gateways, API keys, IP allow-lists | Some services allow by server IP; they need the new one. |
Save your DNS records and lower the TTL
- Take a screenshot or an export of every current DNS record. It's part of your rollback plan.
- Lower the TTL of the A and MX records to something short, such as 300 seconds, ideally at least a day before the switch.
- If you switch without lowering the TTL, some visitors may keep the old IP cached for as long as the old TTL.
Step check
What you should see: A written list of everything you'll move and a copy of the DNS records.
Most common mistake here: Listing only public_html and skipping addon domains, email forwarders and cron jobs.
Next step: Back up the source.
Step 2: Back up the source hosting
A backup does two jobs: it's the material you migrate, and it's the point you can return to if something goes wrong. Don't leave it only on the old server; download it to your computer.
If the source is cPanel
- In the old cPanel, open Files › Backup.
- Use Download a Full Account Backup to create a full backup. You'll get a notification when it's ready; the file is created in the home directory as
backup-...tar.gz. - From Partial Backups on the same screen, also download the Home Directory, each database under MySQL Databases, plus Email Forwarders and Email Filters.
- Check that the downloads fit within the new package's disk space.
If the source is another panel
On Plesk, DirectAdmin or a custom panel, follow the same logic: download all web files as a single archive, export each database as a .sql dump and list the email accounts. With FTP access only, use an FTP client for the files and phpMyAdmin for the database.
A note about passwords
Email and database passwords can't be read from a backup. Accounts restored from a full backup keep their passwords. In a manual migration you'll set new email passwords and share them with your customer, so agree this with them before you start.
Step check
What you should see: A full backup on your computer, plus home directory and database backups.
Most common mistake here: Leaving the only backup on the server you're about to close.
Next step: Prepare the new cPanel account.
Step 3: Create the package and cPanel account in WHM
Prepare the new environment before moving any content. In cPanel, every site lives in a cPanel account, and the package sets that account's limits.
- Log in to WHM with your reseller user (HTTPS on port 2087, or single sign-on from the reseller panel).
- In Packages › Add a Package, create a package that covers the source: disk space, number of databases, email accounts and addon domains should be at least what the source uses.
- In Account Functions › Create a New Account, open the account. Enter the site's real domain (
example.com) in Domain and choose the package. - Note the username. cPanel adds it as a prefix to database and database user names, which matters in step 5.
Related guides: How to Create a Package in WHM · How to Create a Customer Account in WHM
Step check
What you should see: The new account with the right package in WHM › List Accounts.
Most common mistake here: Creating the account with a temporary domain and trying to change it later. Use the real domain; the live site isn't affected until DNS changes.
Next step: Move the files.
Step 4: Move the website files
You can move the files in one of two ways. If the source is also cPanel, restoring the home directory backup is the route with the fewest mistakes.
Route A: restore the home directory backup (cPanel source)
- Open the new account's cPanel (WHM › List Accounts › the cP icon).
- Upload the home directory backup in Files › Backup › Restore a Home Directory Backup.
- The restore writes the home directory, including
public_html, addon domain folders and email data. If the new account already has files you want to keep, back them up first.
Route B: upload with File Manager or FTP
- Pack the source files into a single
.ziparchive. - In the new cPanel's File Manager, open the right document root. For the main domain it's usually
public_html; addon domain document roots are shown under Domains. - Upload the archive, right-click it and choose Extract, then delete the archive.
- For large sites, FTP or SFTP is more reliable, because you can resume if the connection drops.
Don't forget hidden files
Files that start with a dot, such as .htaccess, .env and .user.ini, are hidden by default. Turn on Settings › Show Hidden Files (dotfiles) in File Manager.
Check absolute paths in config files. A path like /home/olduser/public_html at the source should become /home/newuser/public_html.
Permissions should usually be 755 for folders and 644 for files. 777 is a security risk and causes 500 errors on some servers.
Step check
What you should see: Your site's folders, hidden files and index.php or index.html in the document root.
Most common mistake here: Extracting into a subfolder, so the site ends up at example.com/site/ and the main address looks empty.
Next step: Move the databases.
Step 5: Move the databases
A dynamic site (WordPress, e-commerce, a custom app) won't load without its database. Moving a database has five parts: create the database, create a user, grant the user access, import the content and update the site's config file.
- In the new cPanel, open Databases › MySQL Database Wizard and create the database. cPanel adds the username as a prefix, for example
newuser_wp. - In the same wizard, create a database user with a strong password.
- Give the user ALL PRIVILEGES on the database.
- Open phpMyAdmin, select the new database and upload the
.sqldump in the Import tab. - Update the database name, user and password in the site's config file. On cPanel the database host is usually
localhost.
| Application | Config file | Fields to update |
|---|---|---|
| WordPress | wp-config.php | DB_NAME, DB_USER, DB_PASSWORD, DB_HOST |
| Laravel and similar | .env | DB_DATABASE, DB_USERNAME, DB_PASSWORD, DB_HOST |
| OpenCart | config.php and admin/config.php | DB_DATABASE, DB_USERNAME, DB_PASSWORD, file paths |
| Custom application | The file your developer uses | Connection details and any absolute file paths |
If the username changed
A database called olduser_wp at the source becomes newuser_wp in the new account. That's why Backup › Restore a MySQL Database Backup only works smoothly when the cPanel username is the same. If it's different, create the database with the new name in the wizard, import it with phpMyAdmin and update the config file with the new name.
Large databases
phpMyAdmin has an upload limit, shown on the Import screen. If your dump is bigger, compress it as .sql.gz; if it still doesn't fit, ask support for help. A half-finished import leaves tables missing, and the errors often surface later.
Step check
What you should see: The same number of tables in phpMyAdmin as at the source, and the new database details in the config file.
Most common mistake here: Importing the database but forgetting to grant the user access. The site shows "Error establishing a database connection".
Next step: Move email.
Step 6: Move email accounts and messages
Creating an email account in the new cPanel doesn't mean the messages on the old server have moved. The account and the messages inside it are two different things. Before you change DNS, agree with your customer whether existing messages need to be moved.
| Situation | What to do |
|---|---|
| You restored the home directory backup (Route A) | Email data comes with the backup. Check that the accounts appear in Email Accounts with the right quotas. |
| You moved the files manually (Route B) | Recreate every address in Email Accounts › Create. Move old messages separately over IMAP (see below). |
| Email is on Microsoft 365 or Google Workspace | Don't create mailboxes on this server. In Email Routing, choose Remote Mail Exchanger and keep the MX records exactly as they were. |
Moving old messages over IMAP
- Add the same address to an email client (Thunderbird, for example) twice: one connection to the old server and one to the new server. Because DNS hasn't changed yet, use the server address from your service details for the new one.
- Drag the folders from the old account to the new one. If there are many mailboxes, an IMAP sync tool is faster.
- After the MX change, repeat this once for messages that reached the old server late.
Recreate forwarders (Forwarders), autoresponders (Autoresponders) and filters (Email Filters) too. If the source is cPanel, you can restore the forwarder and filter backups from the Backup screen.
Step check
What you should see: A mailbox for every address on the new server and, where needed, the moved folders.
Most common mistake here: Leaving local email on in cPanel for a customer who uses Microsoft 365. Contact-form notifications sent from the site then land in the local mailbox instead of the external service.
Next step: Set PHP and Cron Jobs.
Step 7: Check PHP settings and Cron Jobs
PHP version and limits
- Compare the source PHP version with the one you noted. In the new cPanel, set the version in MultiPHP Manager. If your panel has Select PHP Version, the version and extensions are managed there.
- Make sure the PHP extensions you need (for example
intl,gd,imagick,zip) are on. - In MultiPHP INI Editor, set
memory_limit,upload_max_filesize,post_max_sizeandmax_execution_timeto what the source needs. Values can't exceed the package's resource limits.
Cron Jobs
Cron jobs don't move by themselves, and even when they come with a full backup their paths need checking. Recreate each job in Advanced › Cron Jobs in the new cPanel and update file paths in the command to the new username.
Don't let the same job run twice
If the same cron job runs on both the old and new server during the switch, customers can get duplicate emails and the same invoice can be issued twice. Enable the jobs on the new server at the DNS switch, and stop the old ones at the same moment.
Step check
What you should see: The same PHP version as the source, the extensions you need, and cron jobs with the new paths.
Most common mistake here: Testing the site without checking the PHP version and blaming the files for a 500 error.
Next step: Test the site without changing DNS.
Step 8: Test the site without changing DNS
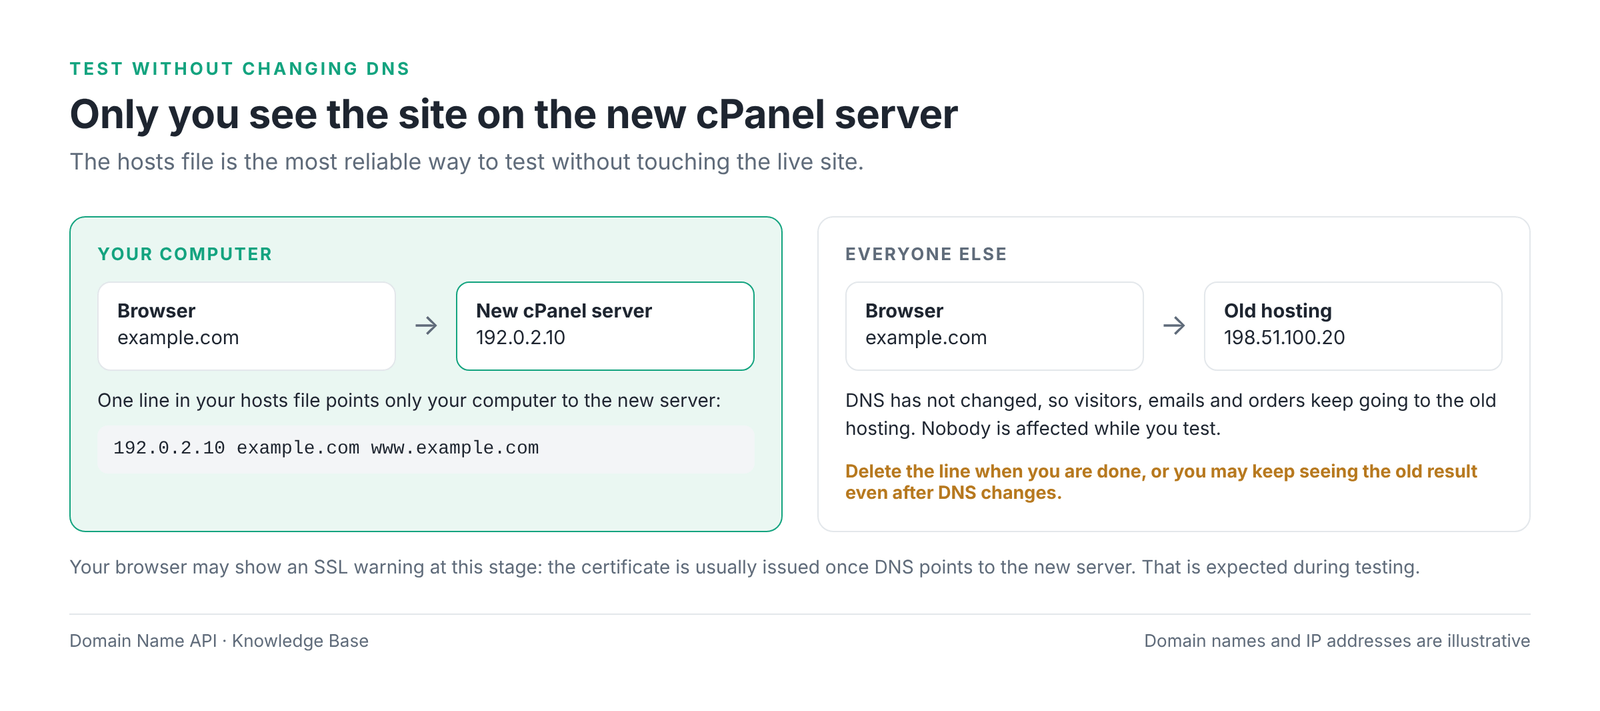
The most reliable way to see the site on the new server before changing DNS is to add one line to your own computer's hosts file. That line doesn't affect anyone else; other visitors stay on the old hosting.
| Operating system | File | How to open it |
|---|---|---|
| Windows | C:\Windows\System32\drivers\etc\hosts | Open Notepad with Run as administrator, then open the file. |
| macOS | /etc/hosts | In Terminal: sudo nano /etc/hosts |
| Linux | /etc/hosts | In Terminal: sudo nano /etc/hosts |
# Test the new cPanel server (delete after testing)
192.0.2.10   example.com   www.example.com
Save, clear the DNS cache (ipconfig /flushdns on Windows) and open the site in a private window. To confirm you're on the new server, you can temporarily put a file called test-new-server.txt in the document root; if that address opens, you're in the right place.
What to test
- Home page and a few inner pages
- Admin login (for example
/wp-admin) - An action that writes to the database: a comment, a sign-up or a draft
- Contact and order forms
- File uploads
- Images, CSS and JavaScript files
- Payment or external API connections (in test mode)
- Addon domains and subdomains, if any
An SSL warning is normal here
Your browser may show a "your connection is not private" warning at this stage. AutoSSL usually issues the certificate after the domain points to the new server. You can click through while testing, but don't enter real payment details.
Step check
What you should see: The site and its admin area working without errors on the new server.
Most common mistake here: Forgetting to delete the hosts line after testing. You'll keep seeing a different result for a while after DNS changes and look for the problem in the wrong place.
Next step: If the site is dynamic, plan the final sync first, then change DNS.
Avoid data loss on dynamic sites
On e-commerce, membership, booking, forum or CRM sites, new orders and sign-ups keep landing on the old server between your first copy and the DNS switch. If you don't bring them across, they're lost.
- Choose a low-traffic maintenance window and tell your customer.
- When it starts, turn on maintenance mode or stop writes on the old site (no new orders or sign-ups).
- Take a final database dump and re-import it on the new server (final sync). Copy any files uploaded in the meantime too.
- Change DNS and turn off maintenance mode on the new server.
This shortens downtime but doesn't remove it. Rather than promising zero downtime, tell your customer about a short, planned maintenance window.
Step 9: Point DNS to the new server
The DNS switch is the one step that's hard to undo, so it comes last. You don't need to transfer the domain: it stays where it's registered and you only change where it points. Changing nameservers isn't required for every migration either.
| Scenario | What changes | When to choose it |
|---|---|---|
| A. Switch to private nameservers | The domain's nameservers become ns1.example.net and ns2.example.net. DNS records are then managed in the new cPanel's Zone Editor. | When you'll manage the customer's DNS. |
| B. Update records only | At the current DNS provider (Cloudflare, for example), set the A record to 192.0.2.10, and update the www and AAAA records if needed. | When DNS is hosted elsewhere and will stay there. |
Related guide: How to Create Private Nameservers on cPanel Reseller Hosting
In scenario A, keep your email and verification records
Once nameservers change, the DNS zone in the new cPanel takes over. The zone created with the account has default records only; it doesn't include the custom records from the old DNS.
Before changing nameservers, recreate in Zone Editor the MX, SPF (TXT), DKIM, DMARC and verification TXT records for Google, Microsoft, Meta and similar services that you saved in step 1.
Step check
What you should see: The new IP (192.0.2.10) for nslookup example.com; in scenario A, the new nameservers for nslookup -type=NS example.com.
Most common mistake here: Changing DNS before testing, or changing nameservers before adding custom records to the new zone.
Next step: Verify SSL, email and site functions.
Step 10: Verify SSL, email and site functions
SSL and HTTPS
- Once DNS points to the new server, open Security › SSL/TLS Status in the new cPanel.
- If there's no certificate for the domain and
www, use Run AutoSSL. The old certificate doesn't move to the new account on its own. - For the HTTPS redirect, use Force HTTPS Redirect on the Domains screen. If
.htaccessalso redirects, turning both on can cause a redirect loop. - Check the padlock, the site with and without
www, and mixed-content warnings.
- Send a new message and receive one from an outside address (a personal email, for example).
- Check SPF and DKIM status in Email › Email Deliverability. If DNS is managed elsewhere, add the suggested records to that zone.
- Confirm the DMARC record still has its old value.
Post-migration checklist
"The site loads" doesn't mean the migration worked. All of the following need to be verified:
- The domain points to the new server
- HTTPS with a valid certificate (
wwwincluded) - Home page and inner pages
- Admin login
- Database reads and writes
- Forms and file uploads
- Images, CSS and JavaScript
- Redirects
- Cron Jobs (running on the new server, stopped on the old one)
- Sending and receiving email
- MX, SPF, DKIM, DMARC records
- Addon domains and subdomains
- External integrations (payments, APIs, IP allow-lists)
- Error logs (cPanel › Metrics › Errors)
Step 11: Keep both environments live while you observe
After DNS changes, some visitors and mail servers may keep using the old address for a while. Rather than a fixed number of days, look for these signs:
- There's no meaningful traffic left in the old server's access logs.
- No new email is landing on the old server, and anything that did has been moved.
- Everything on the checklist is verified and your customer has confirmed the site works.
- On business-critical sites, at least one full business cycle (an order, an invoice, a newsletter) has completed on the new server.
Step 12: Close the old hosting last
- Take one last full backup of the old hosting and keep it.
- Confirm the cron jobs on the old server have stopped.
- Turn off renewal for the old hosting or cancel the account. If the domain is with the same company, make sure you close only the hosting service, not the domain.
Rollback plan
Before you start, four things should be true: the old hosting is live, a full backup is in your hands, the old DNS records are saved, and the rollback steps are written down. Rolling back before the DNS switch is easy; nothing has changed yet. After the switch, pointing DNS back may not be enough on its own: orders, sign-ups and emails that reached the new server have to be moved back to the old one.
Troubleshooting
| Problem | Likely cause | Fix |
|---|---|---|
| 403 Forbidden | No index file in the document root, wrong permissions, or an .htaccess rule blocks access | Check the files are in the right folder with 644/755 permissions; temporarily rename .htaccess and retry. |
| 500 Internal Server Error | Incompatible PHP version, missing extension, faulty .htaccess directive | Match the PHP version to the source; read the error under Metrics › Errors. |
| "Error establishing a database connection" | Wrong database name, user or password in the config, or the user has no privileges | Check the prefixed names (newuser_...) and ALL PRIVILEGES. |
| cPanel default page appears | Files are in the wrong document root, or the hosts line has the wrong IP | Confirm the document root under Domains; check the IP in your hosts line. |
| Site still loads from the old server | DNS hasn't propagated, TTL is high, or your hosts line is still there | Check with nslookup, delete the hosts line and clear the DNS cache. |
| Redirect loop (too many redirects) | Force HTTPS and an .htaccess or in-app redirect are both on | Keep the redirect in one place only. |
| SSL warning persists | AutoSSL hasn't run yet, or the domain points to another IP | Confirm DNS and use Run AutoSSL; if there's a CAA record, check it allows the certificate authority. |
| Incoming email doesn't arrive | MX points to the old server, or Email Routing is wrong | Check MX and the Email Routing setting. |
| Sent email goes to spam | SPF or DKIM is missing | Add the suggested records from Email Deliverability. |
| Database import stops halfway | The file exceeds the phpMyAdmin limit | Compress it as .sql.gz; if it still doesn't fit, ask support. |
| Cron job doesn't run | The path still contains the old username | Update paths in the command to /home/newuser/.... |
| Disk or resource limit warning | The package is smaller than the source site | Enlarge the package in WHM or move the account to a suitable one. |
Common mistakes
- Starting without a backup, or leaving it only on the server you'll close.
- Moving the files and forgetting the database.
- Treating email account creation as if it moves the messages.
- Treating server-level tools that reseller WHM doesn't show (Transfer Tool) as reseller tools.
- Changing DNS before testing.
- Not checking the PHP version and extensions.
- Forgetting cron jobs, or running them on both servers.
- Losing MX, SPF, DKIM and verification records when changing nameservers.
- Skipping the final sync on dynamic sites.
- Closing the old hosting before verification is complete.
- Not checking SSL and the
wwwaddress.
Frequently asked questions
How do I migrate a website to cPanel?
Take an inventory of the source and make a full backup, create the package and cPanel account in WHM, then move the files, databases, email and cron jobs. Test the site through the hosts file without changing DNS. When the tests pass, point DNS to the new server, verify SSL and email, and close the old hosting last.
Can I restore a full cPanel backup myself on a reseller account?
No, not with a reseller account. Restoring a full backup (cpmove) and WHM's Transfer Tool need server administrator rights. Prepare your backup file and open a ticket. If you'd rather do it yourself, restore the home directory and MySQL partial backups from the Backup screen in the new cPanel account.
Do I need to transfer my domain to move hosting?
No. The domain can stay with its current registrar. You only change where it points: either set its nameservers to the new host or update the A record at your current DNS provider to the new server's IP. A domain transfer is a separate, optional process.
Do I have to change nameservers?
No. If your DNS is managed elsewhere, such as Cloudflare, updating the A record (and www and AAAA records if needed) to the new IP is enough. If you do change nameservers, DNS management moves to the new cPanel, so add your MX, SPF, DKIM and verification records to the new zone first.
Does email move automatically?
It depends on the method. If you restore a cPanel home directory backup, email data comes with it. In a manual migration, creating an account in the new cPanel doesn't bring old messages; move them separately with an email client or an IMAP sync tool. Either way, check the accounts and quotas.
How do I move a database to cPanel?
Export the database at the source as a .sql dump. In the new cPanel, create a database and user with MySQL Database Wizard, give the user ALL PRIVILEGES and import the dump in phpMyAdmin. Then update the database name, user and password in the site's config file; cPanel adds the username as a prefix to these names.
Can I test the site without changing DNS?
Yes. Add one line with the new server's IP and your domain to your computer's hosts file, and the site will load from the new server only on your computer. Other visitors stay on the old hosting. When you're done, delete the line and clear your DNS cache.
Does my SSL certificate move automatically?
The old certificate doesn't move to the new account. In the new cPanel, AutoSSL issues a certificate once the domain points to the new server. After the DNS switch, check SSL/TLS Status and use Run AutoSSL if needed. If you have a paid certificate, install the certificate and private key separately.
When should I close the old hosting?
There's no fixed number of days. Close it when the old server no longer gets meaningful traffic or new email, the post-migration checklist is verified and your customer has approved the site. Take one last full backup first and make sure the old server's cron jobs have stopped.
How do I avoid losing data during the migration?
Make a full backup and keep the old hosting live. For sites that write to the database all the time, like shops and membership sites, plan a short maintenance window: stop writes, move the latest database to the new server, then change DNS. That final sync stops data created after the first copy from being lost.
How do I migrate a WordPress site to cPanel?
The same steps apply: move the files and the database, update the database details in wp-config.php and test the site through the hosts file. If the domain stays the same, there's no need to change URLs. If the domain changes too, update the old URLs in the database with a safe search-and-replace tool.
How long does a migration take?
For a small site, the hands-on work usually takes 30 to 90 minutes. Large files and databases, many mailboxes and message migration take longer. DNS propagation can take a few more hours; lowering the TTL in advance shortens that.
Related guides
- How to Create Private Nameservers on cPanel Reseller Hosting
- How to Create a Package in WHM
- How to Create a Customer Account in WHM
- First Login to Your Reseller Package: How to Access WHM
- How to Migrate a Website to Plesk Reseller Hosting
If you get stuck, include the domain you're moving, the source control panel and the step you're on when you open a ticket, so our team can pick up exactly where you are.
Sell hosting under your own brand
Explore cPanel Reseller Hosting packages to sell hosting under your own brand.
Explore cPanel Reseller Hosting